
Martin Identification / Prewar Martins
Prewar Martin Guitar Guide: Bracing And Identification
Date a claimed prewar Martin from its serial and model, then check the construction inside and outside the guitar. Brace position, brace carving, neck dimensions and repairs can distinguish instruments that share the same model name.
Look Up Your Serial NumberWhat Prewar Means For A Martin Guitar
Collectors commonly use prewar for 1930s Martins and sometimes include wartime examples made before the late-1944 change away from scalloped braces. Record the actual production year. The label does not describe one fixed set of specifications.
Separate the body family from the period. A small-body 0-17, an OM and a dreadnought need their own construction comparisons. A slotted headstock or a 12-fret joint can also appear on later guitars.
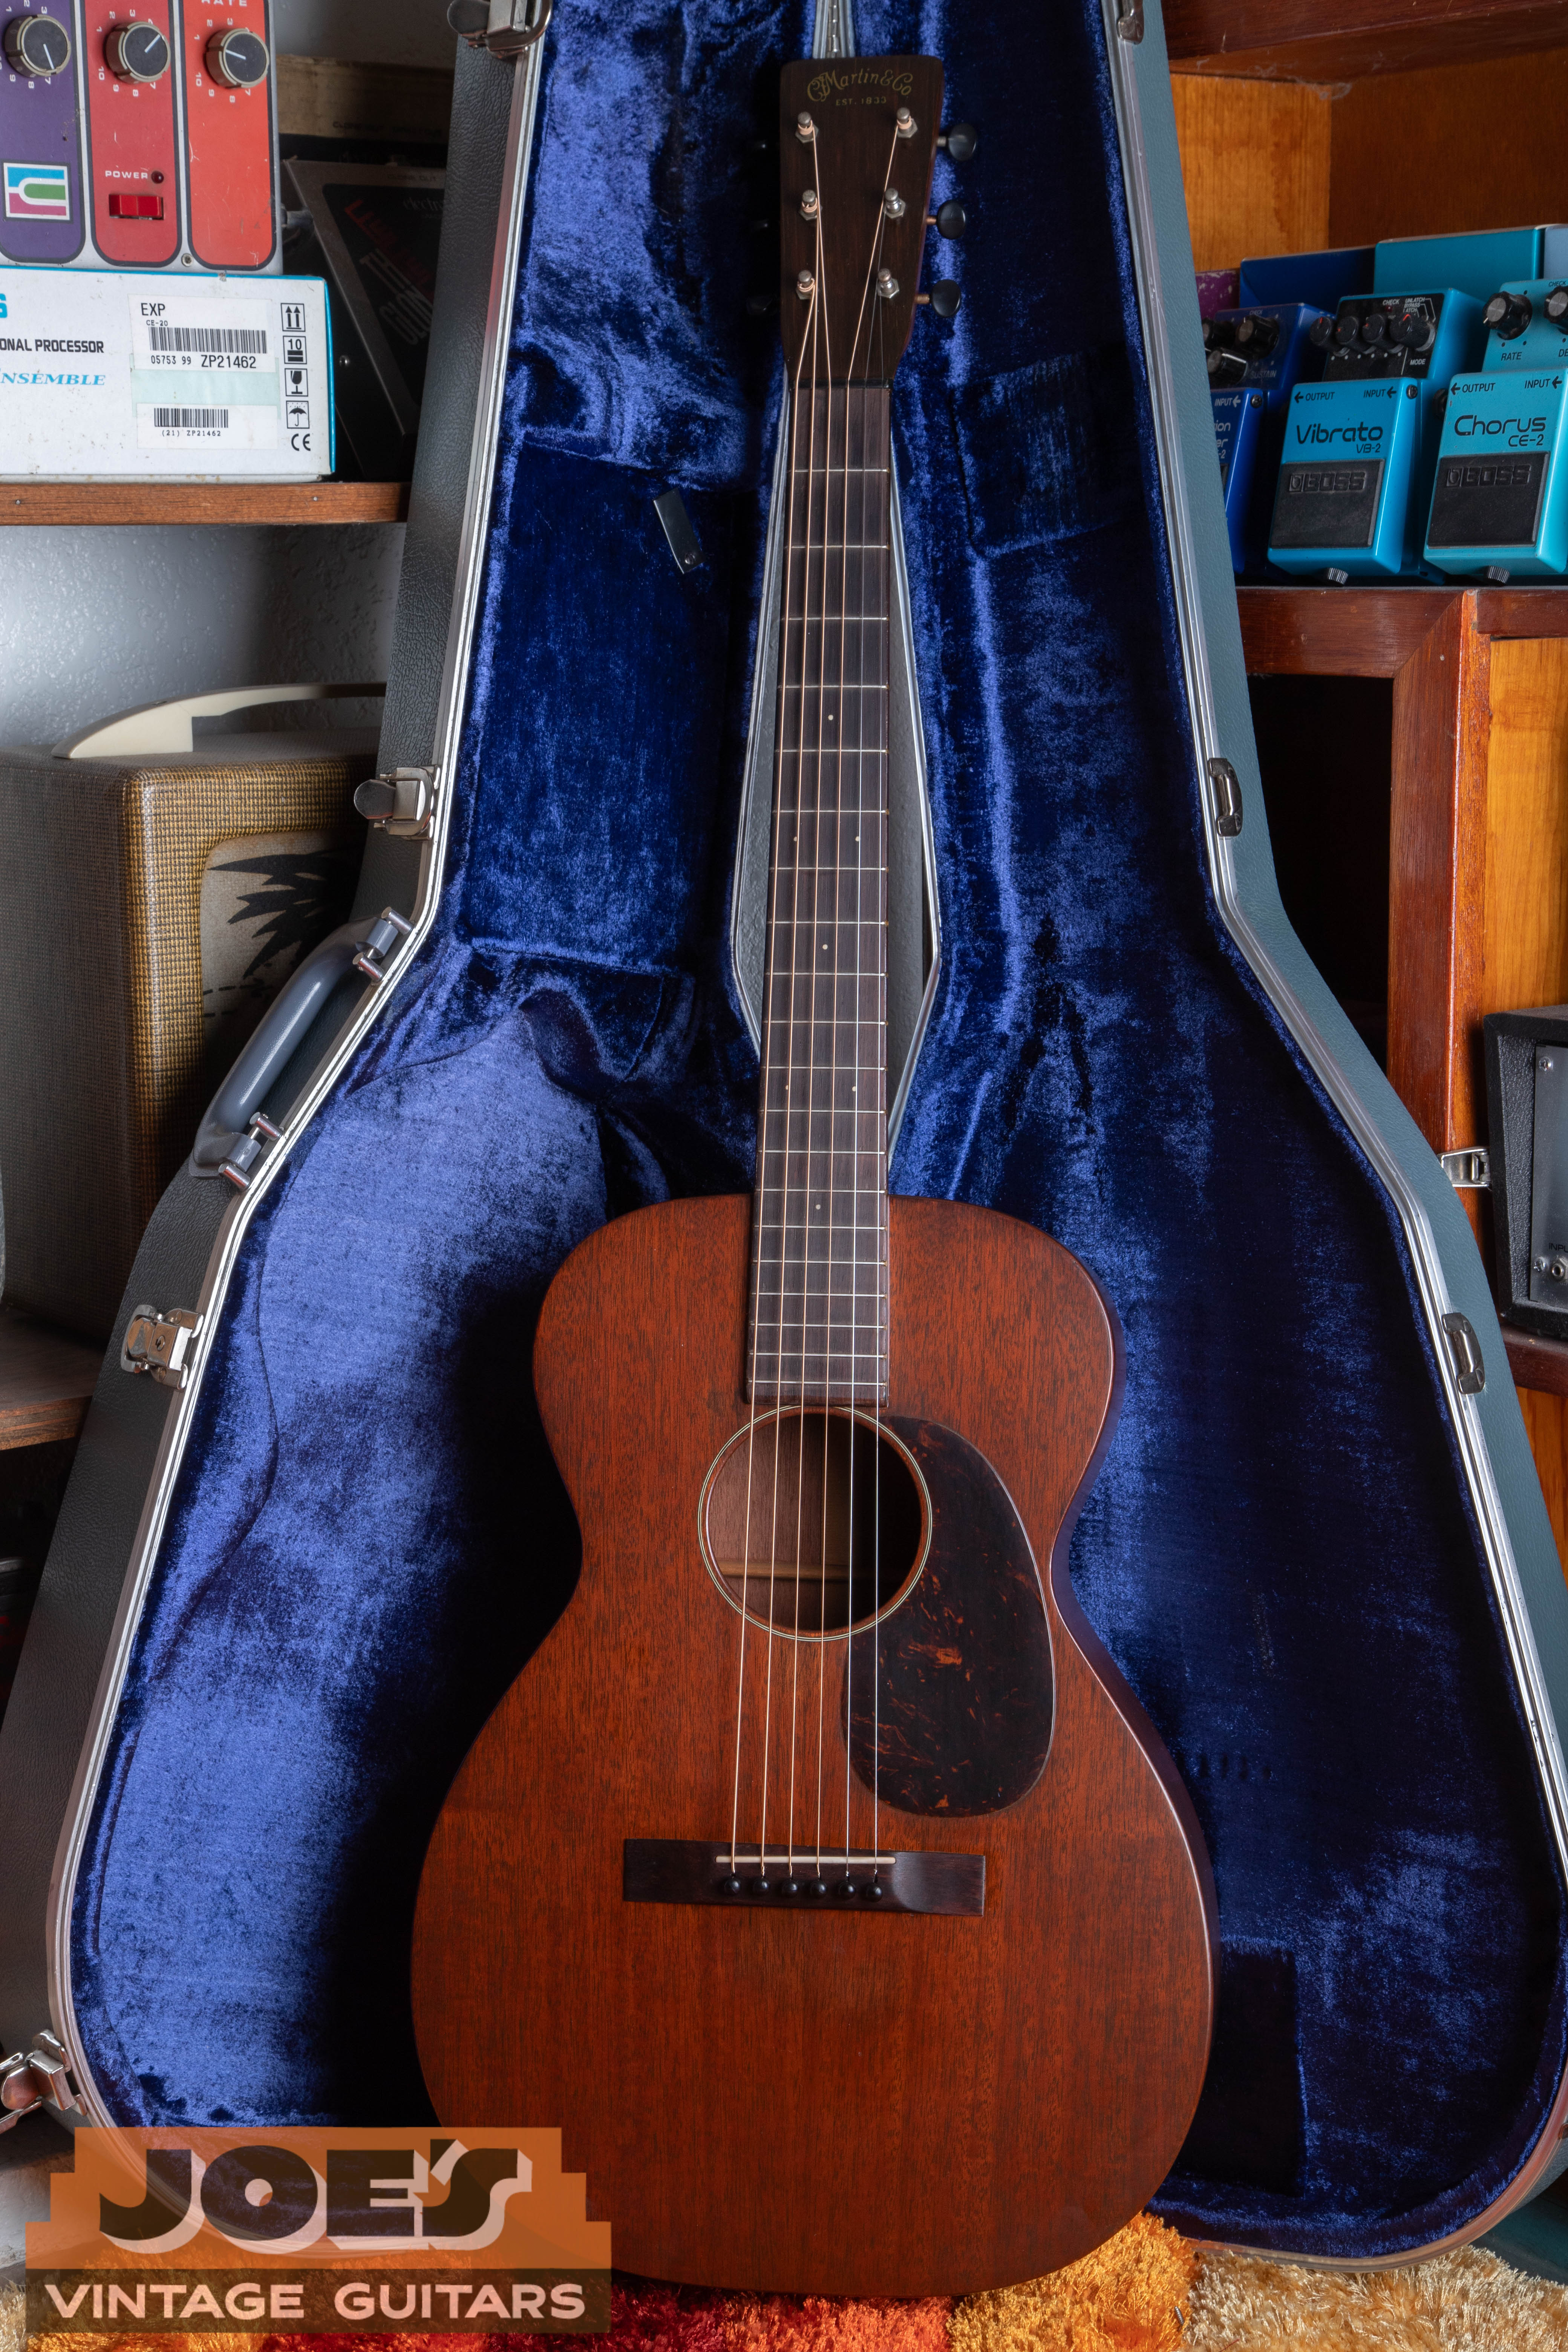
This 1937 0-17 is a small-body example with a mahogany top, back and sides. Its 14-fret body joint and solid headstock are visible here. The front view doesn’t reveal its internal bracing.
Early X-Bracing And The Move To Steel Strings
X-bracing alone does not prove that an early Martin left the factory with steel strings. Martin used X-bracing on gut-string guitars long before steel became standard. The factory’s original string choice and setup are separate from the instrument’s present ability to withstand string tension.
Two 2-17s shipped with steel strings on March 27, 1922. Style 18 followed as standard equipment in 1923, and Style 28 by 1926. Construction grew stronger gradually, so those shipping dates are not universal bracing-change dates.
For an early guitar, ask a repairer to assess the actual top, bridge, plate, neck and repairs before selecting strings. Its production year and an X-shaped brace pattern can’t make that decision for you.
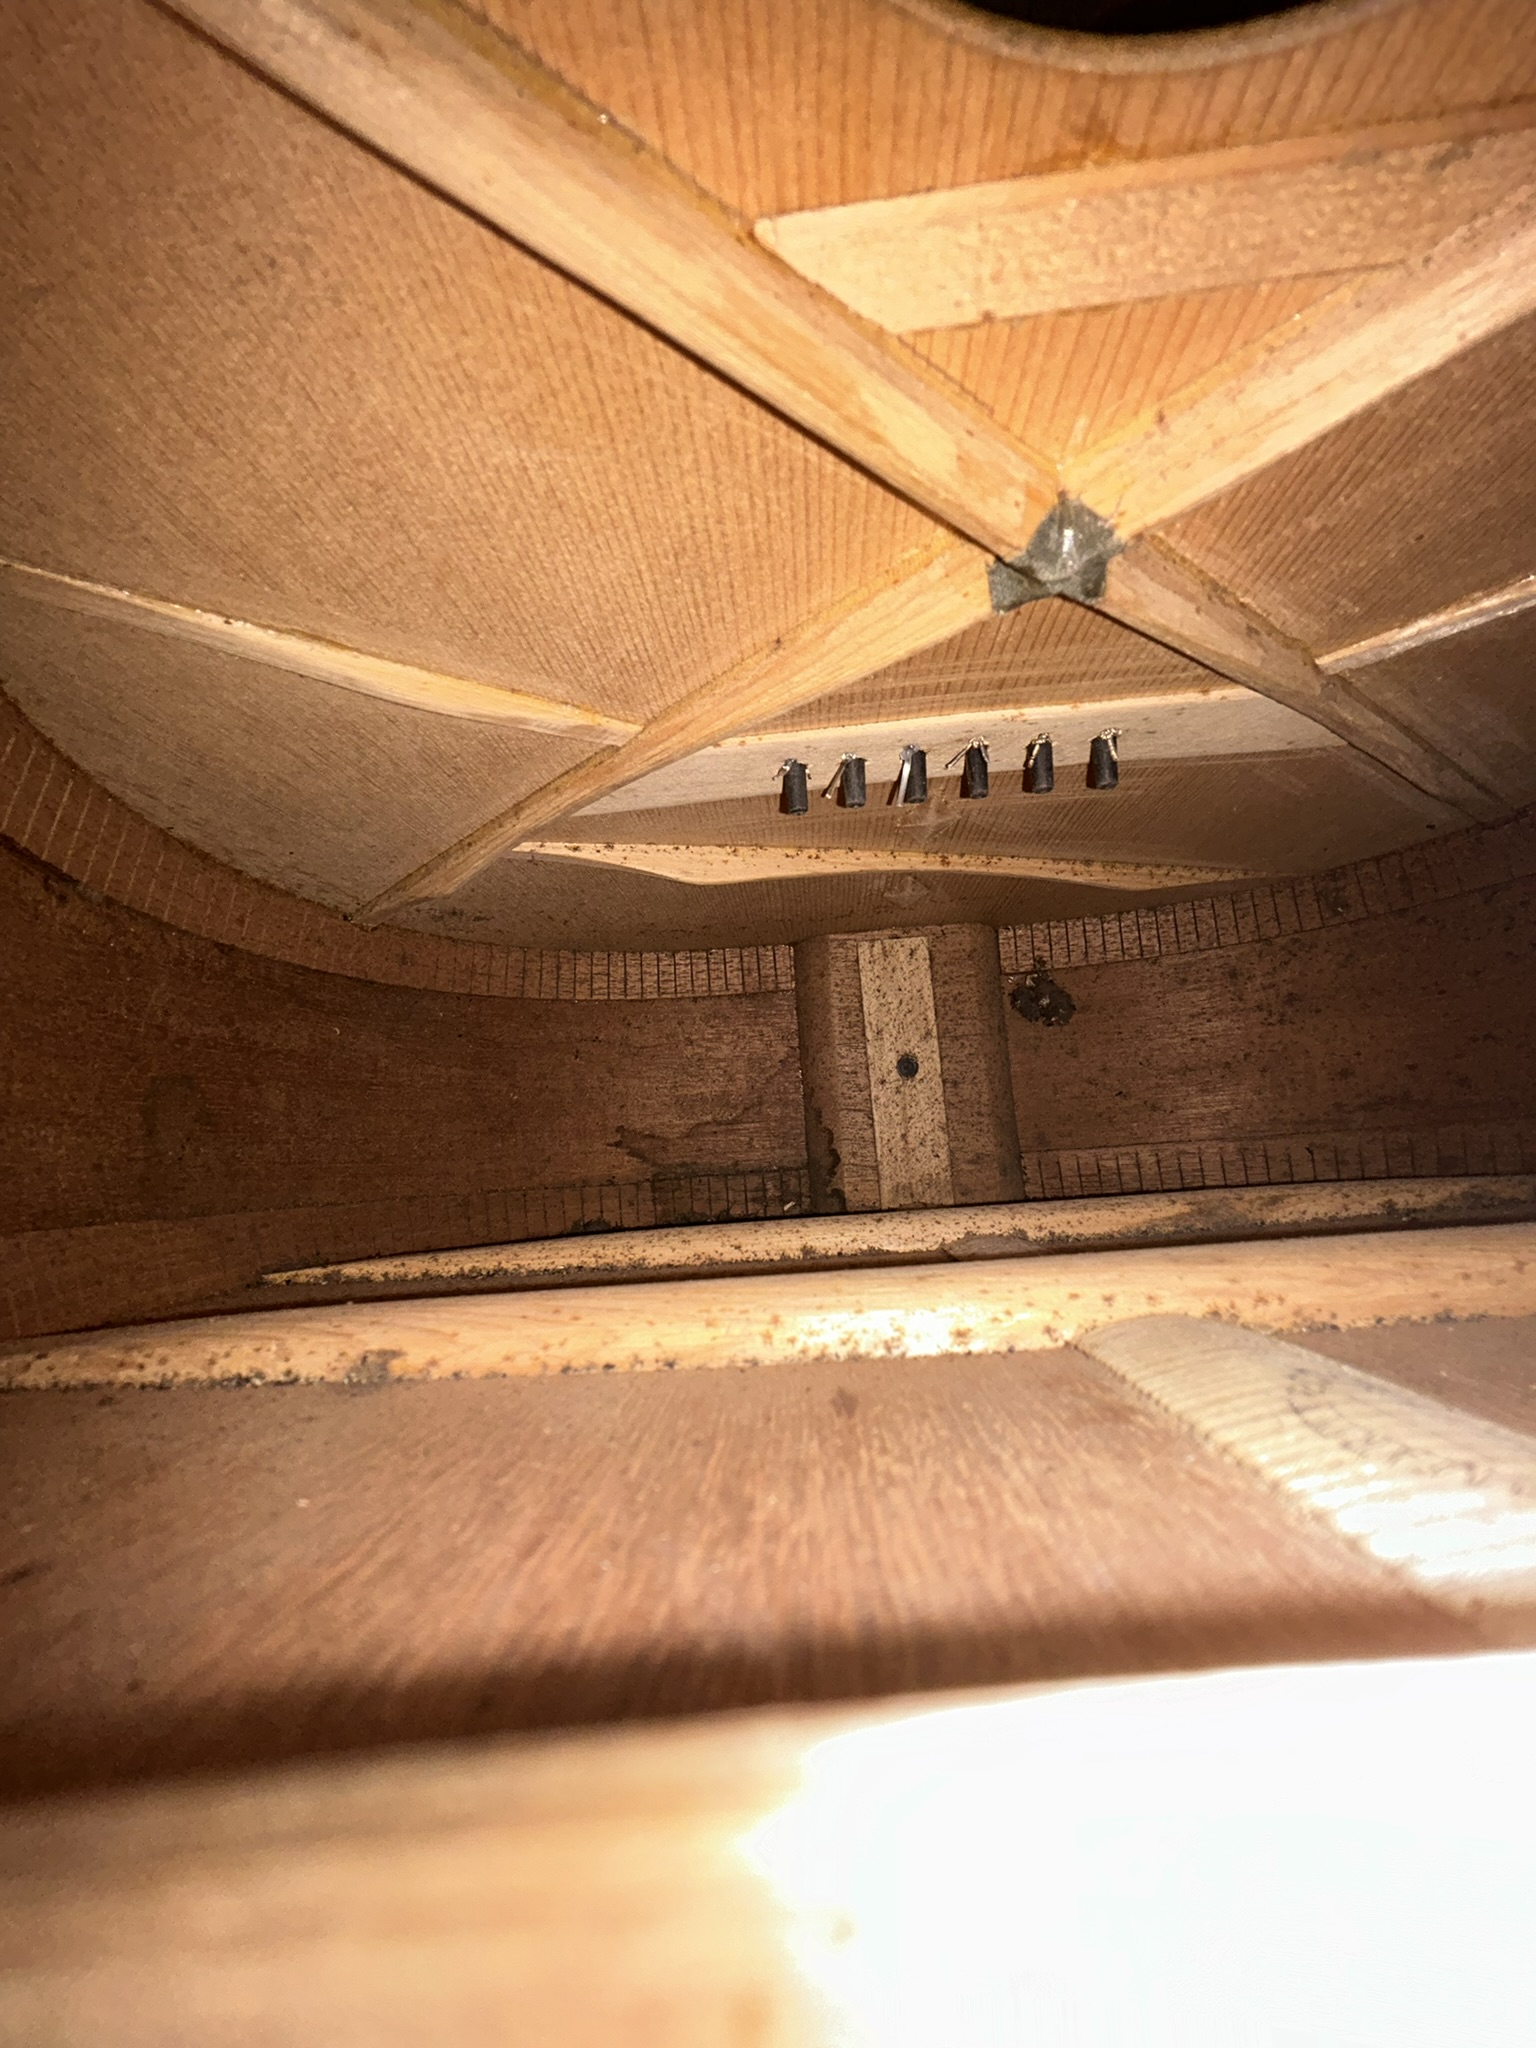
The X crossing and bridge plate are visible in this 1914 guitar, made before steel strings became standard on Style 18. The current strings do not establish its original setup.
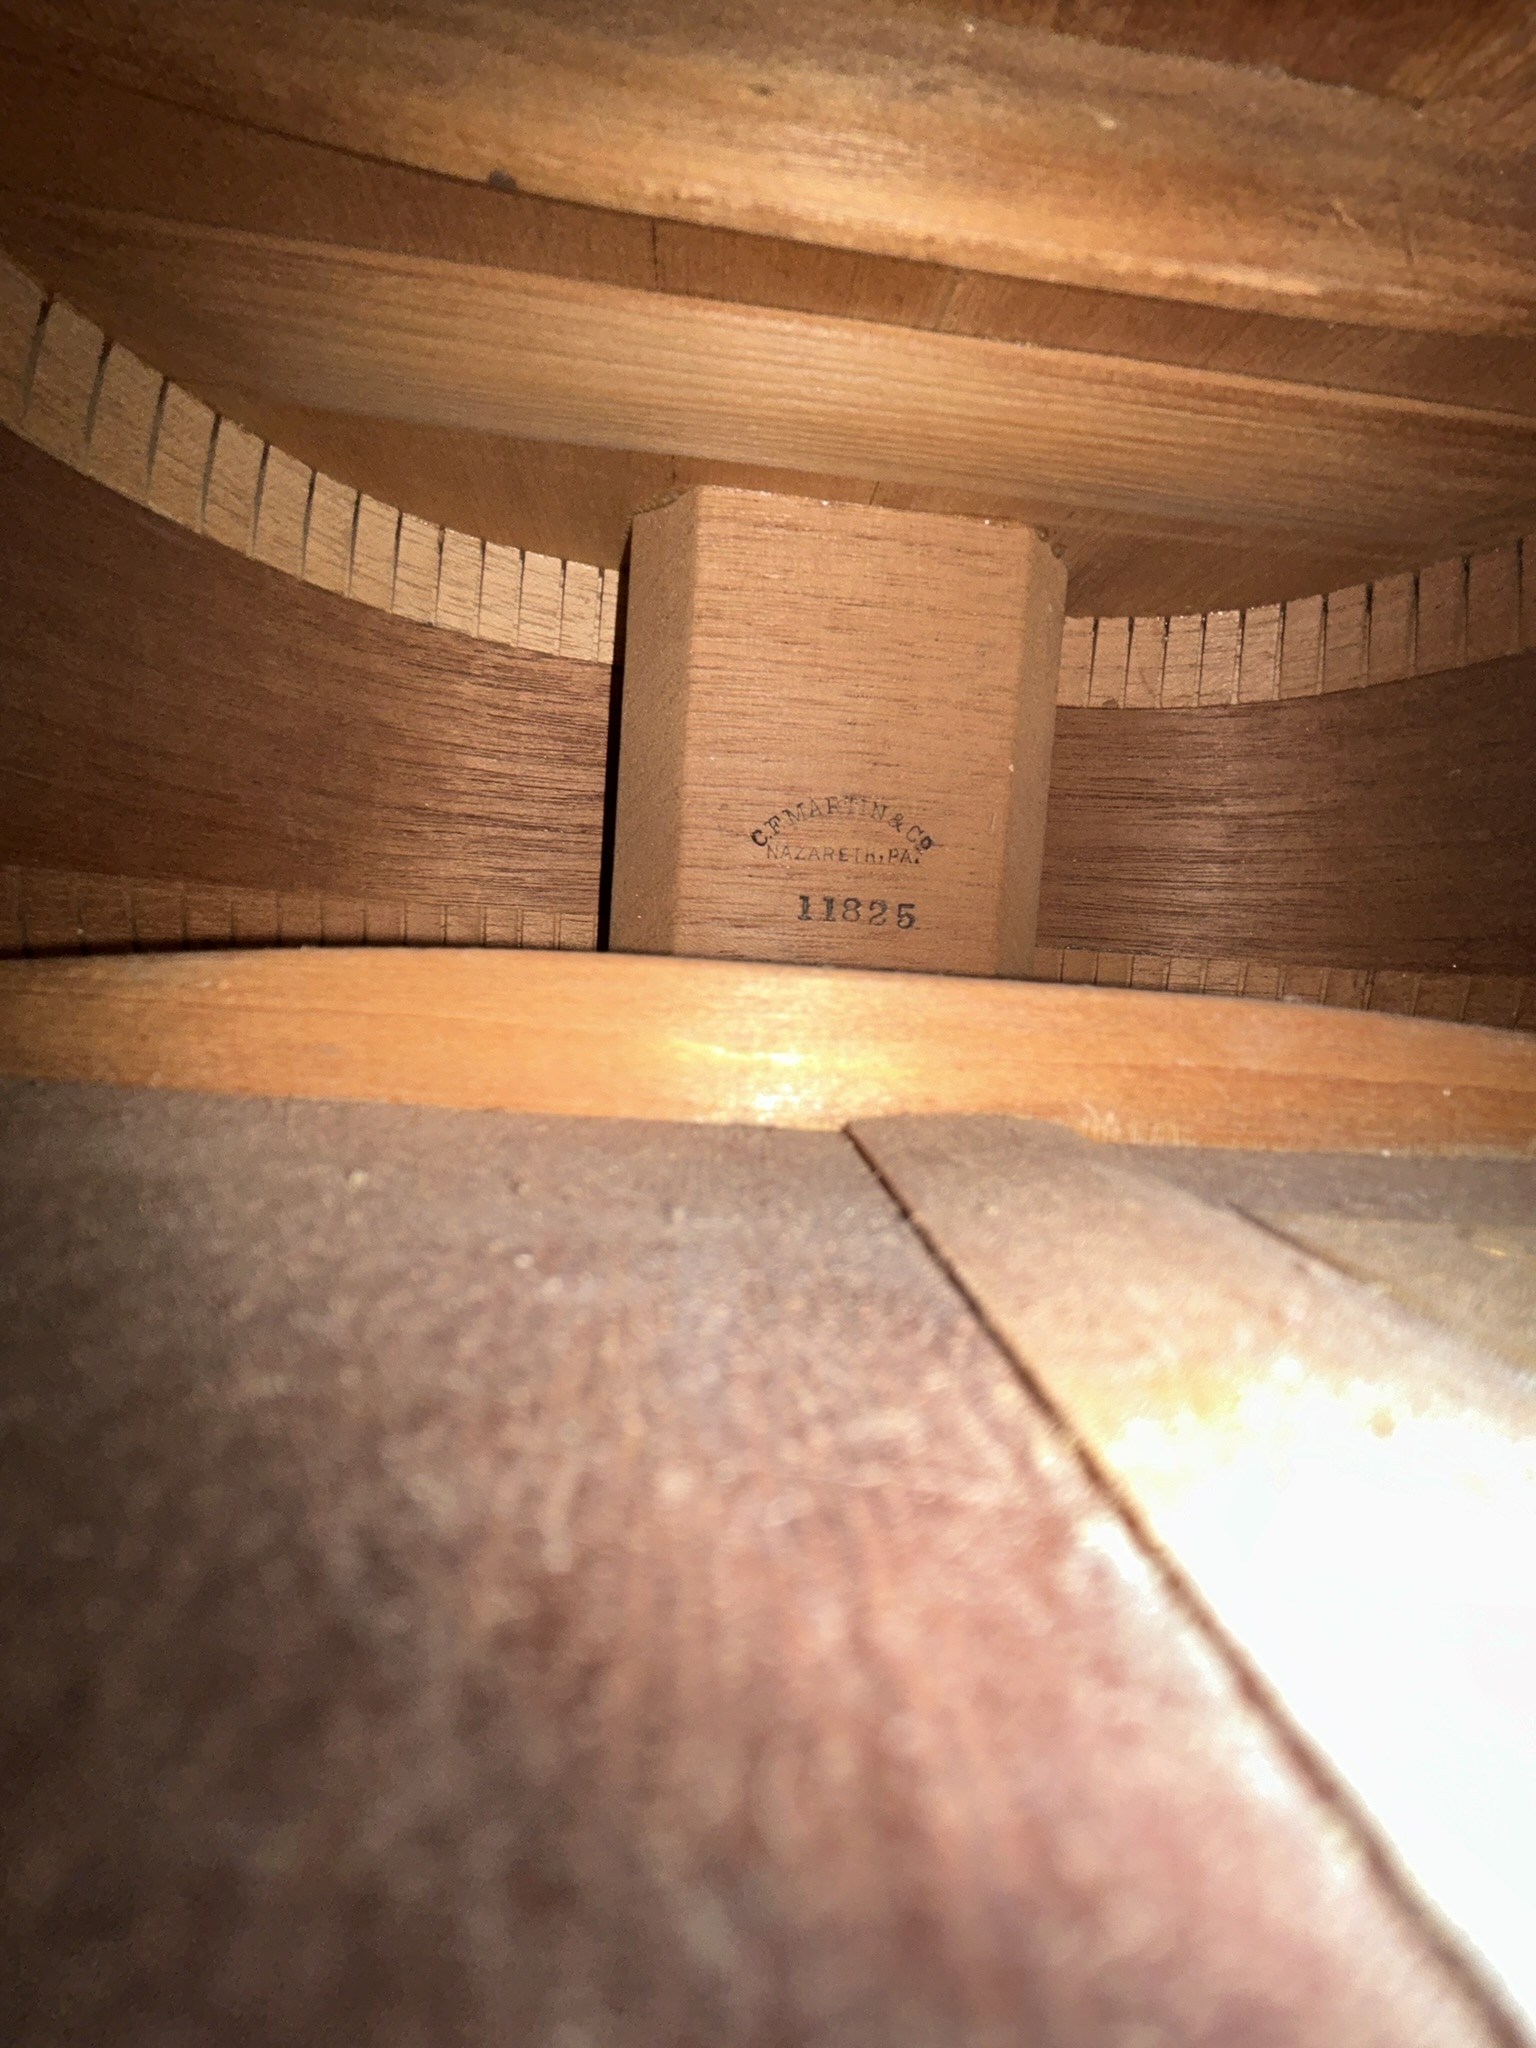
The neck block carries the maker’s stamp and serial 11825, with no model stamp. The serial dates this 0-18 to 1914; inspect its construction and condition before choosing strings.
Forward And Rearward X-Brace Position
The main top braces cross below the soundhole. Forward and rearward describe where that crossing sits. Scalloped describes the carved profile of a brace. Record position and profile separately.
Martin moved the dreadnought X-brace crossing farther from the soundhole during 1938. A rear-braced late-1930s D-18 or D-28 can still have scalloped braces. Small-body and 12-fret models need their own chronology.
To document the position, photograph the soundhole edge and complete X crossing with a ruler in the same plane. Record the measurement and the points used. An isolated photograph of a tone bar cannot establish where the X crosses.
Record the body joint as well as the body size. The 12-fret and 14-fret layouts need separate comparisons, and smaller 14-fret bodies changed on a different schedule from dreadnoughts. Avoid applying the 1938 dreadnought date to smaller bodies such as the 00-21.
The two arms of the X frame the bridge area; smaller tone bars continue behind it. Above the soundhole, the transverse brace and any flat brace under the fingerboard extension are another part of the structure. Include that upper area in an inspection set instead of photographing only the lower bout.
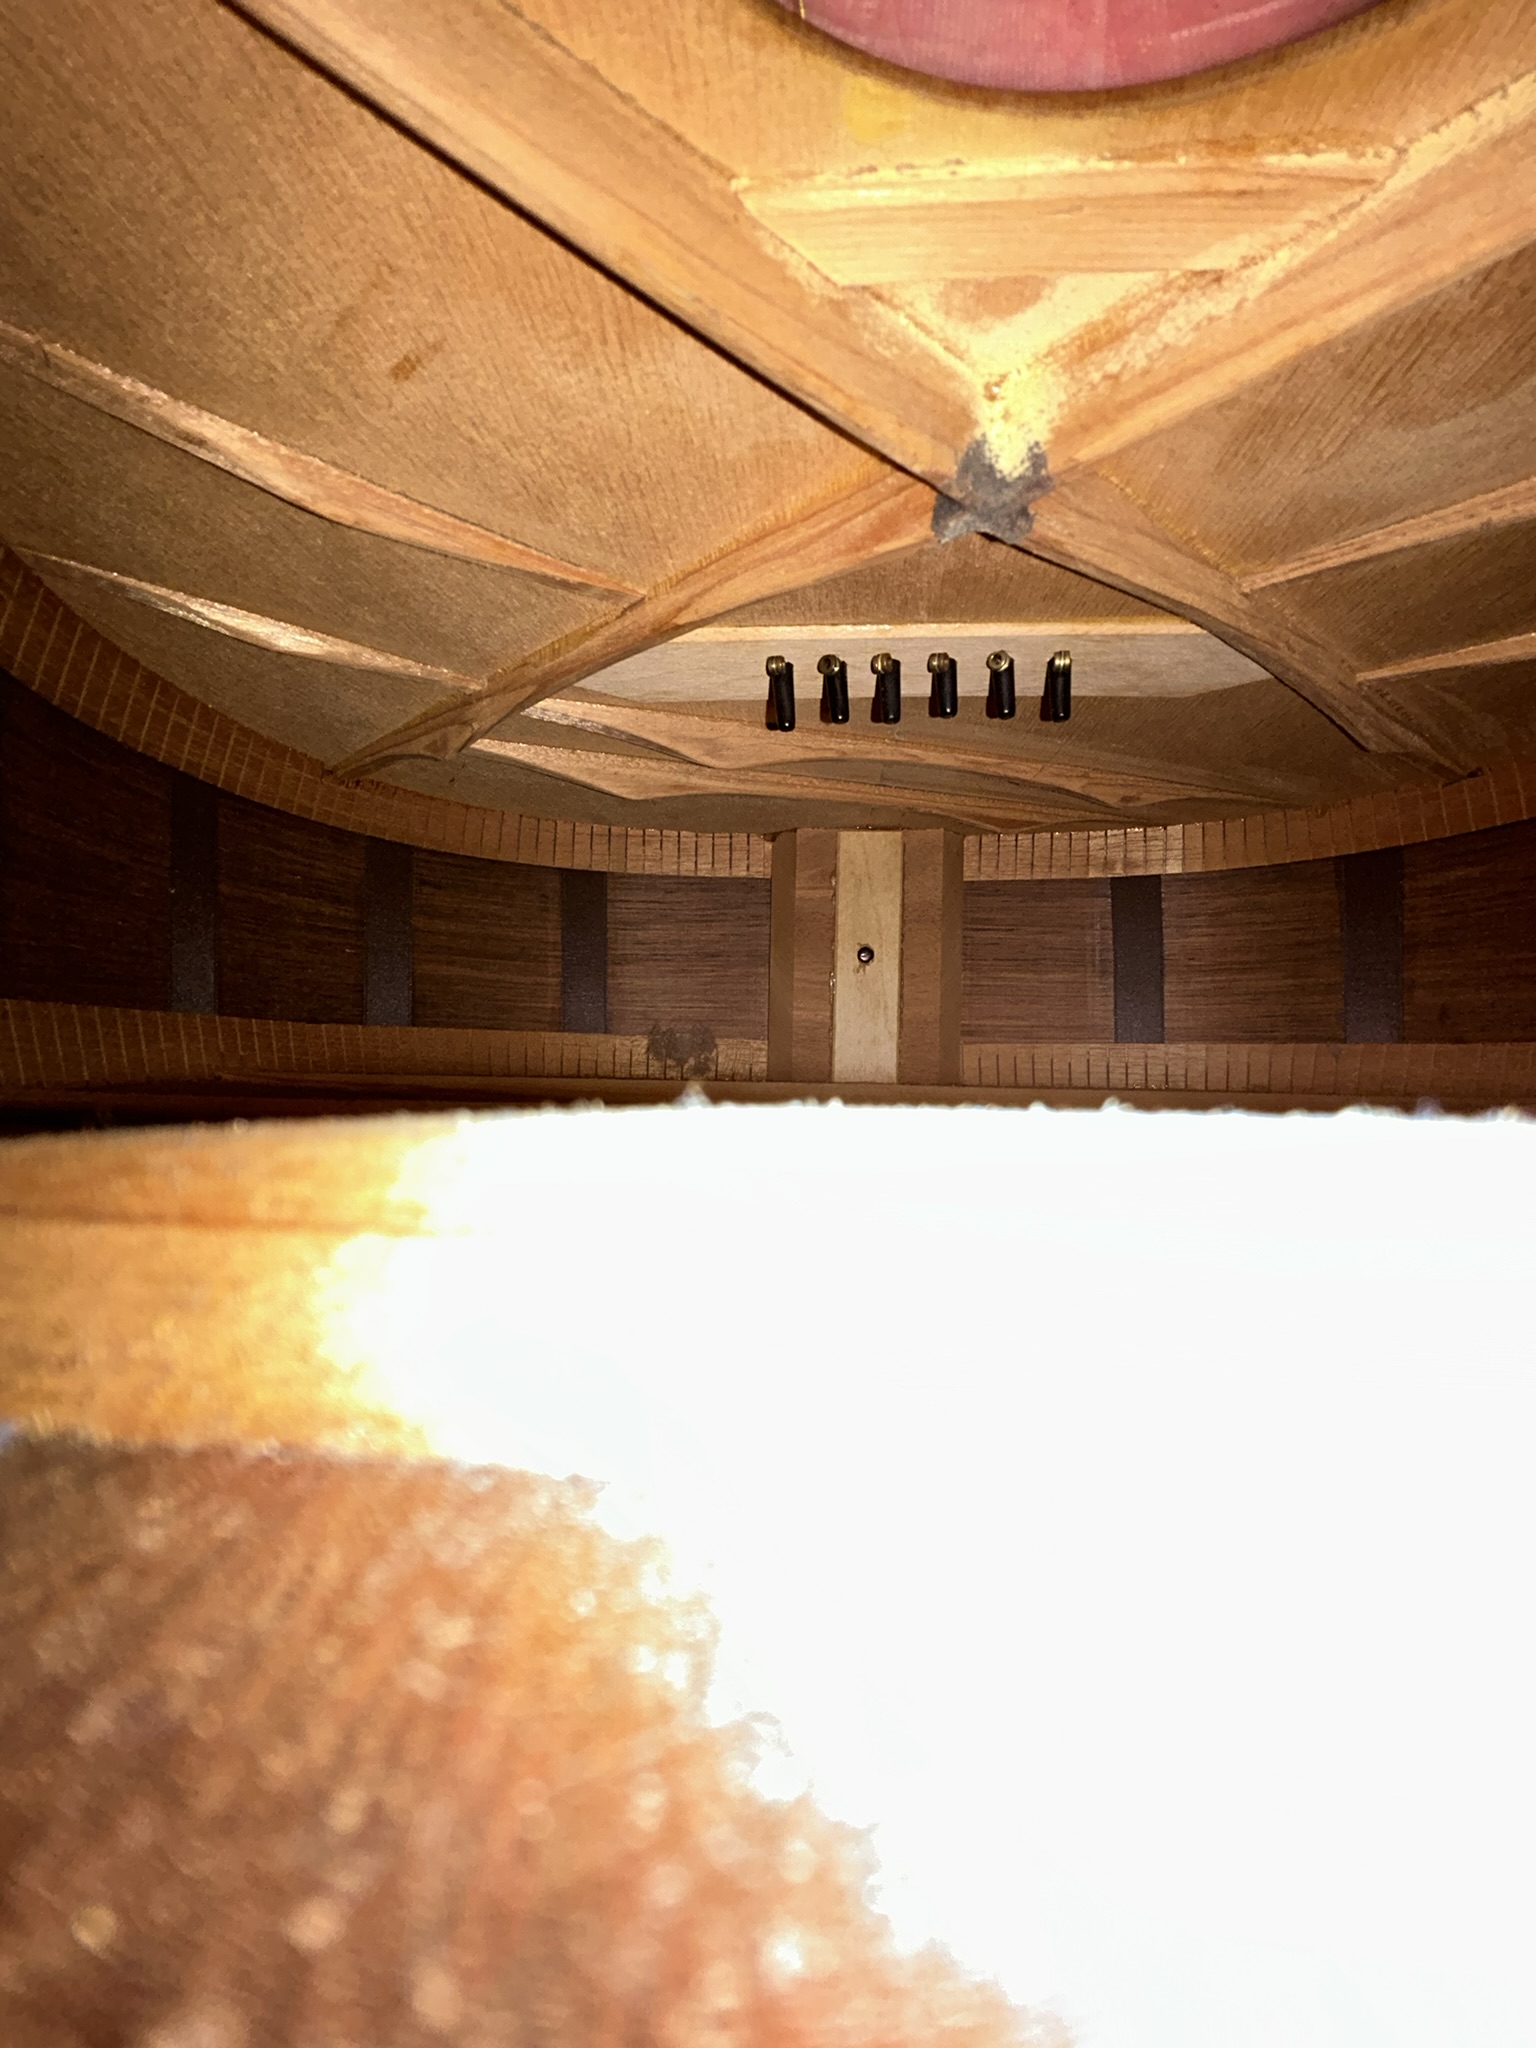
The V below the soundhole leads to the X crossing. The bridge plate and six pins sit farther back between the lower arms. This 12-fret 00-21 needs a different comparison from a 14-fret dreadnought.
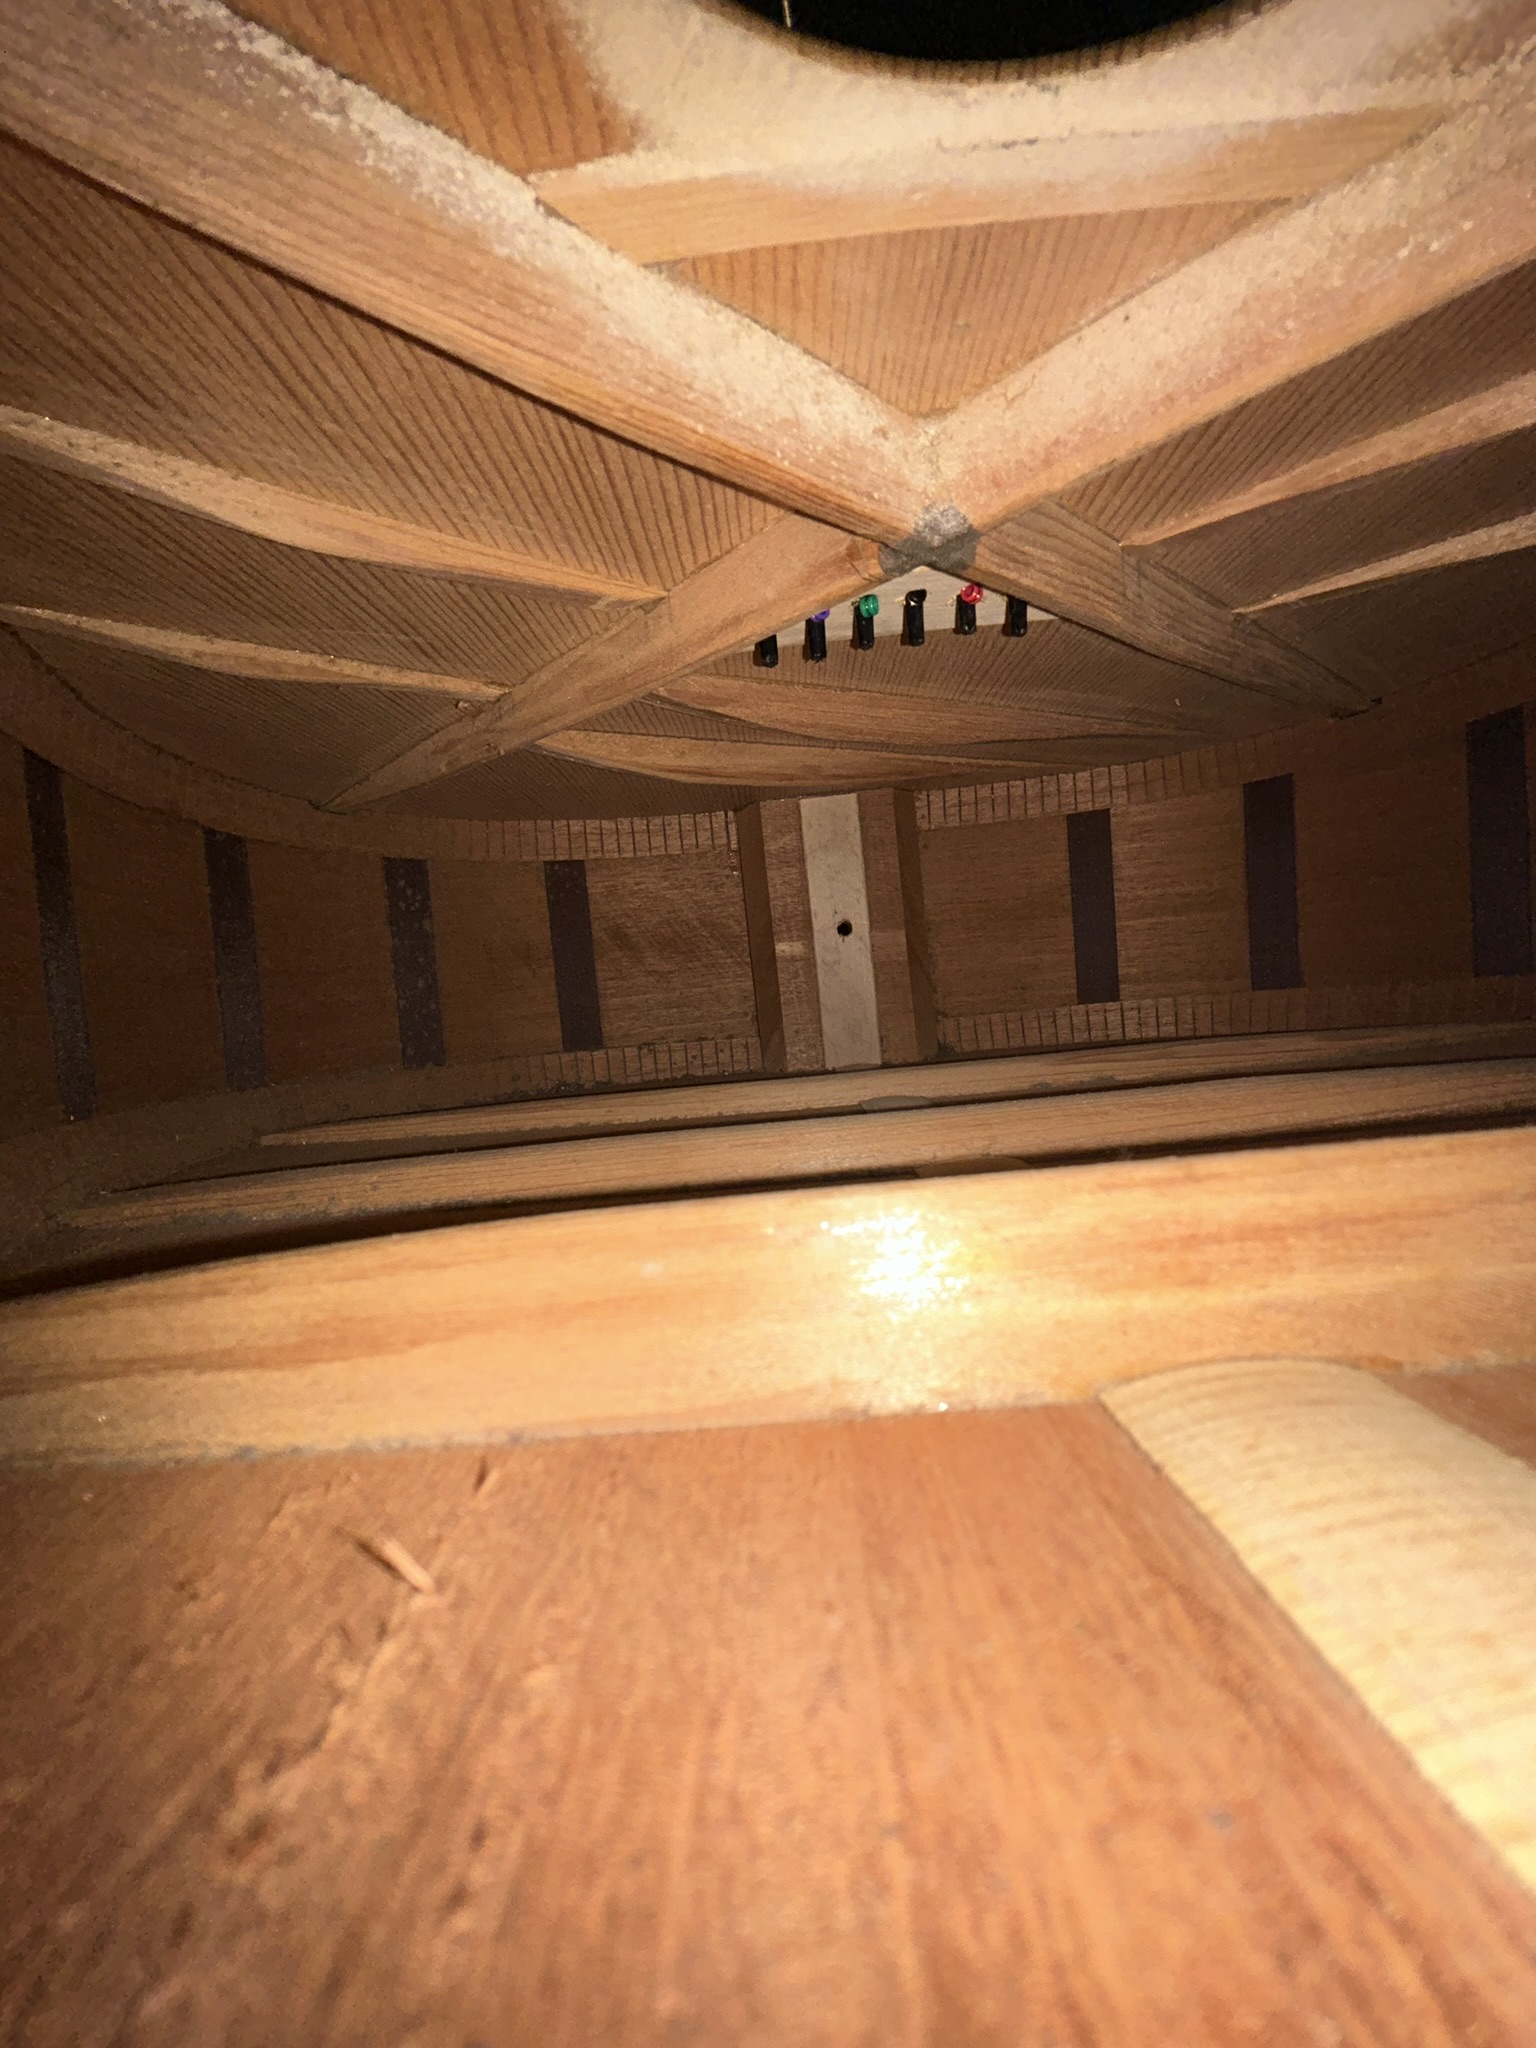
Use the visible soundhole edge and X crossing to locate the reach described above. This postwar D-18 provides a dreadnought comparison; the camera angle alone does not provide an exact distance.
Scalloped Braces And The Postwar Transition
Scalloped braces have scooped sections between higher areas. Tapered braces reduce in height toward their ends. Follow the whole visible profile; a dark patch or a camera angle can hide the carving.
Regular vintage flat-tops began changing from scalloped to tapered braces in late 1944. Tapered profiles gradually became straighter through the late 1940s. A 1946 herringbone D-28 therefore belongs to a different bracing period from a 1930s example.
When comparing two guitars, inspect the same parts of their brace layouts. A close-up of a lower tone bar cannot establish the X-brace position. Photograph the complete crossing separately, with a measurement scale.
Later brace shaving can change the profile. Compare repair records with the wood itself before treating visible scalloping as factory work.
The term “tapered” still covers different profiles. Some 1945 guitars have slimmer tapers than the rounder profiles seen in 1946 examples. Compare the actual carving without assuming every guitar in either year received identical braces.
Follow the lower arms of the X and the smaller bars behind the plate to see the changing brace height. Keep the brace profile separate from the position of the crossing.
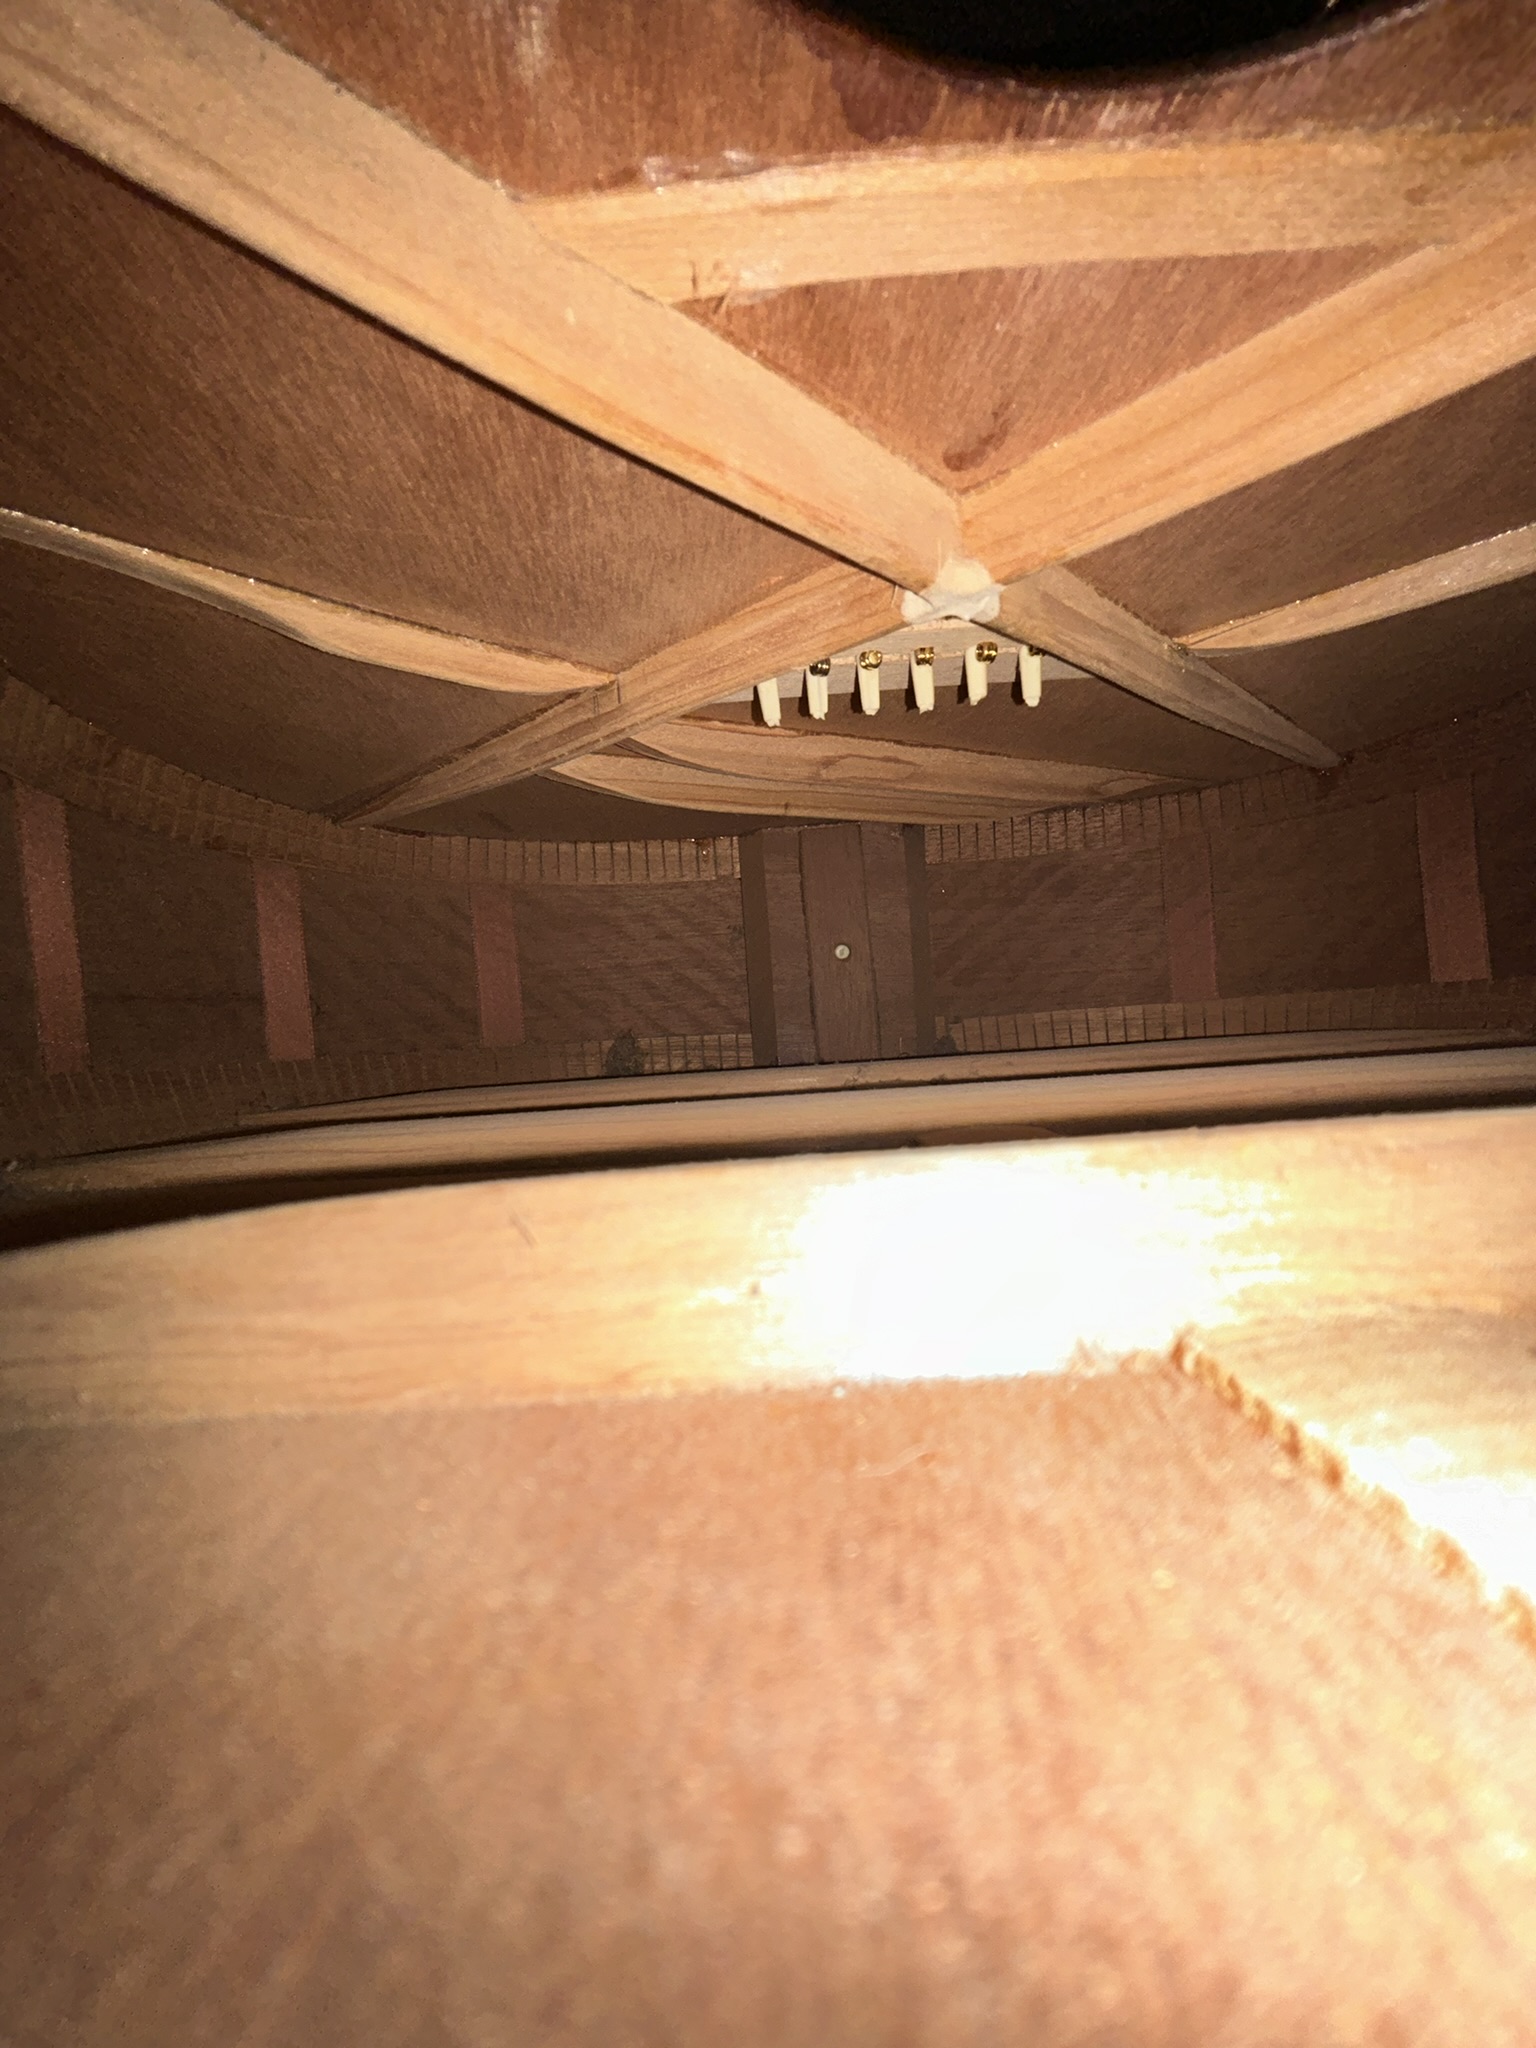
The lower X-brace arms have a straighter profile than the scooped 1936 example. Both photos show small bodies, but the 00-17 has a mahogany top and belongs to a later construction period.
Bridge Plates, Pin Holes And Repairs
The bridge plate lies against the underside of the top, below the bridge. It supports that area and gives the string ball ends a hard bearing surface. Photograph its outline, the pin holes, string ball ends and the surrounding wood. Keep the full plate in view so its size and any added patches can be compared.
Ask whether the plate was replaced, capped or repaired and whether nearby braces were reglued or shaved. An added patch can hide the original plate surface. A photograph alone may not establish the wood species or the history of every glue joint.
Tucked ends extend into small recesses in the X-braces. Photograph those joints from both sides, along with the front and rear edges. The pin row alone can hide an oversized replacement or an added layer.
Look for worn or enlarged pin holes, cracks between holes, a cap over the plate and ball ends pulling into the wood. Include a low side view to show thickness and any separation from the top. A close view of the string attachments and a wider view of the whole plate answer different questions.
Early X-braced Martins used thin mahogany plates before maple became common by the 1880s. For the later plates in this chart, width means the front-to-back dimension, not the span across the guitar. These are approximate comparisons; body size, production overlap and repairs still matter.
| Period | Plate Detail | What To Photograph |
|---|---|---|
| Early 1900s | About 1 inch wide; trapezoidal outline, ends tucked into the X-braces. | Full outline and the joints at both ends. |
| 1927 | Plates begin getting slightly thicker as construction develops for steel strings. | Thickness at an exposed edge, plus any repair layer. |
| By Early 1933 | About 1 3/8 inches wide; six-sided outline with tucked ends. | Clipped corners as well as the pin-hole row. |
| Around 1940 To 1941 | Trapezoidal maple plates again, about 1 3/8 inches wide and thicker in the examples. | A side angle showing thickness and any added layer. |
The light-colored plate runs across the top between the X-brace arms. Its front and rear edges, pin row and surrounding braces are visible together.
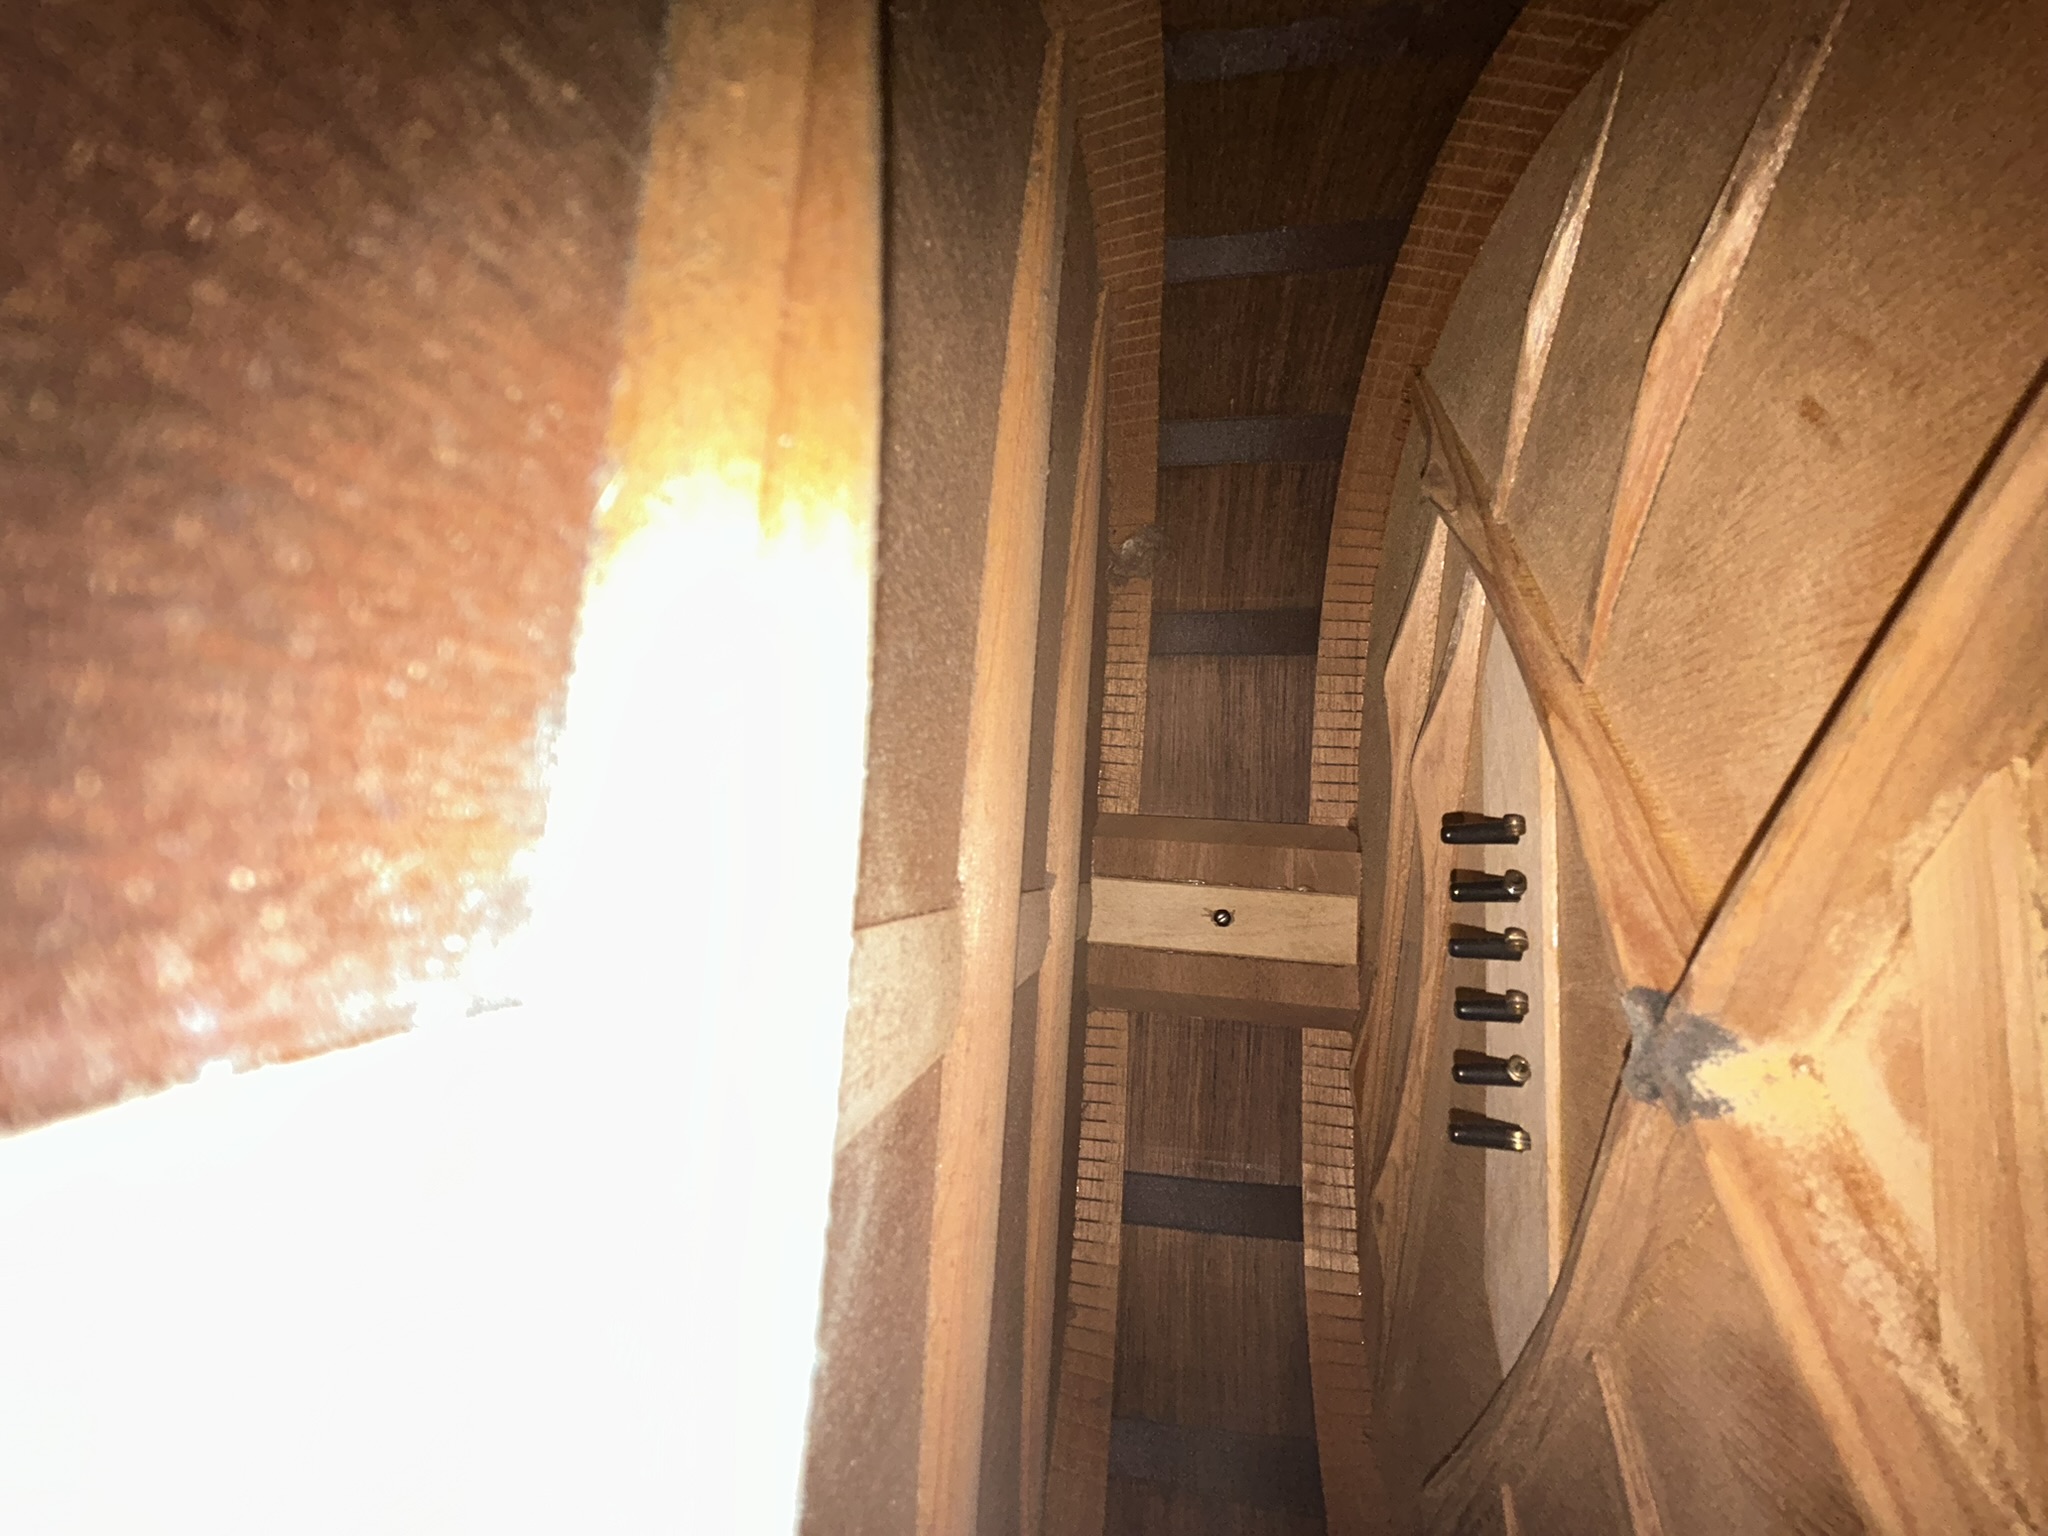
This second angle shows the plate surface and string attachments beneath the bridge. Compare it with the wider 1936 view above when inspecting the outline and joints.
Nut Width, Body Joints And Frets
Many 14-fret necks narrowed from 1 3/4 inches to 1 11/16 inches at the nut during 1939. Measure across the fingerboard at the nut, rather than between the outer strings. The 1938 brace shift and 1939 neck change are separate events.
Check the fret where the neck meets the body before comparing dimensions. Neck width, neck profile and string spacing describe different measurements. A replacement nut may change string spacing without changing the fingerboard width.
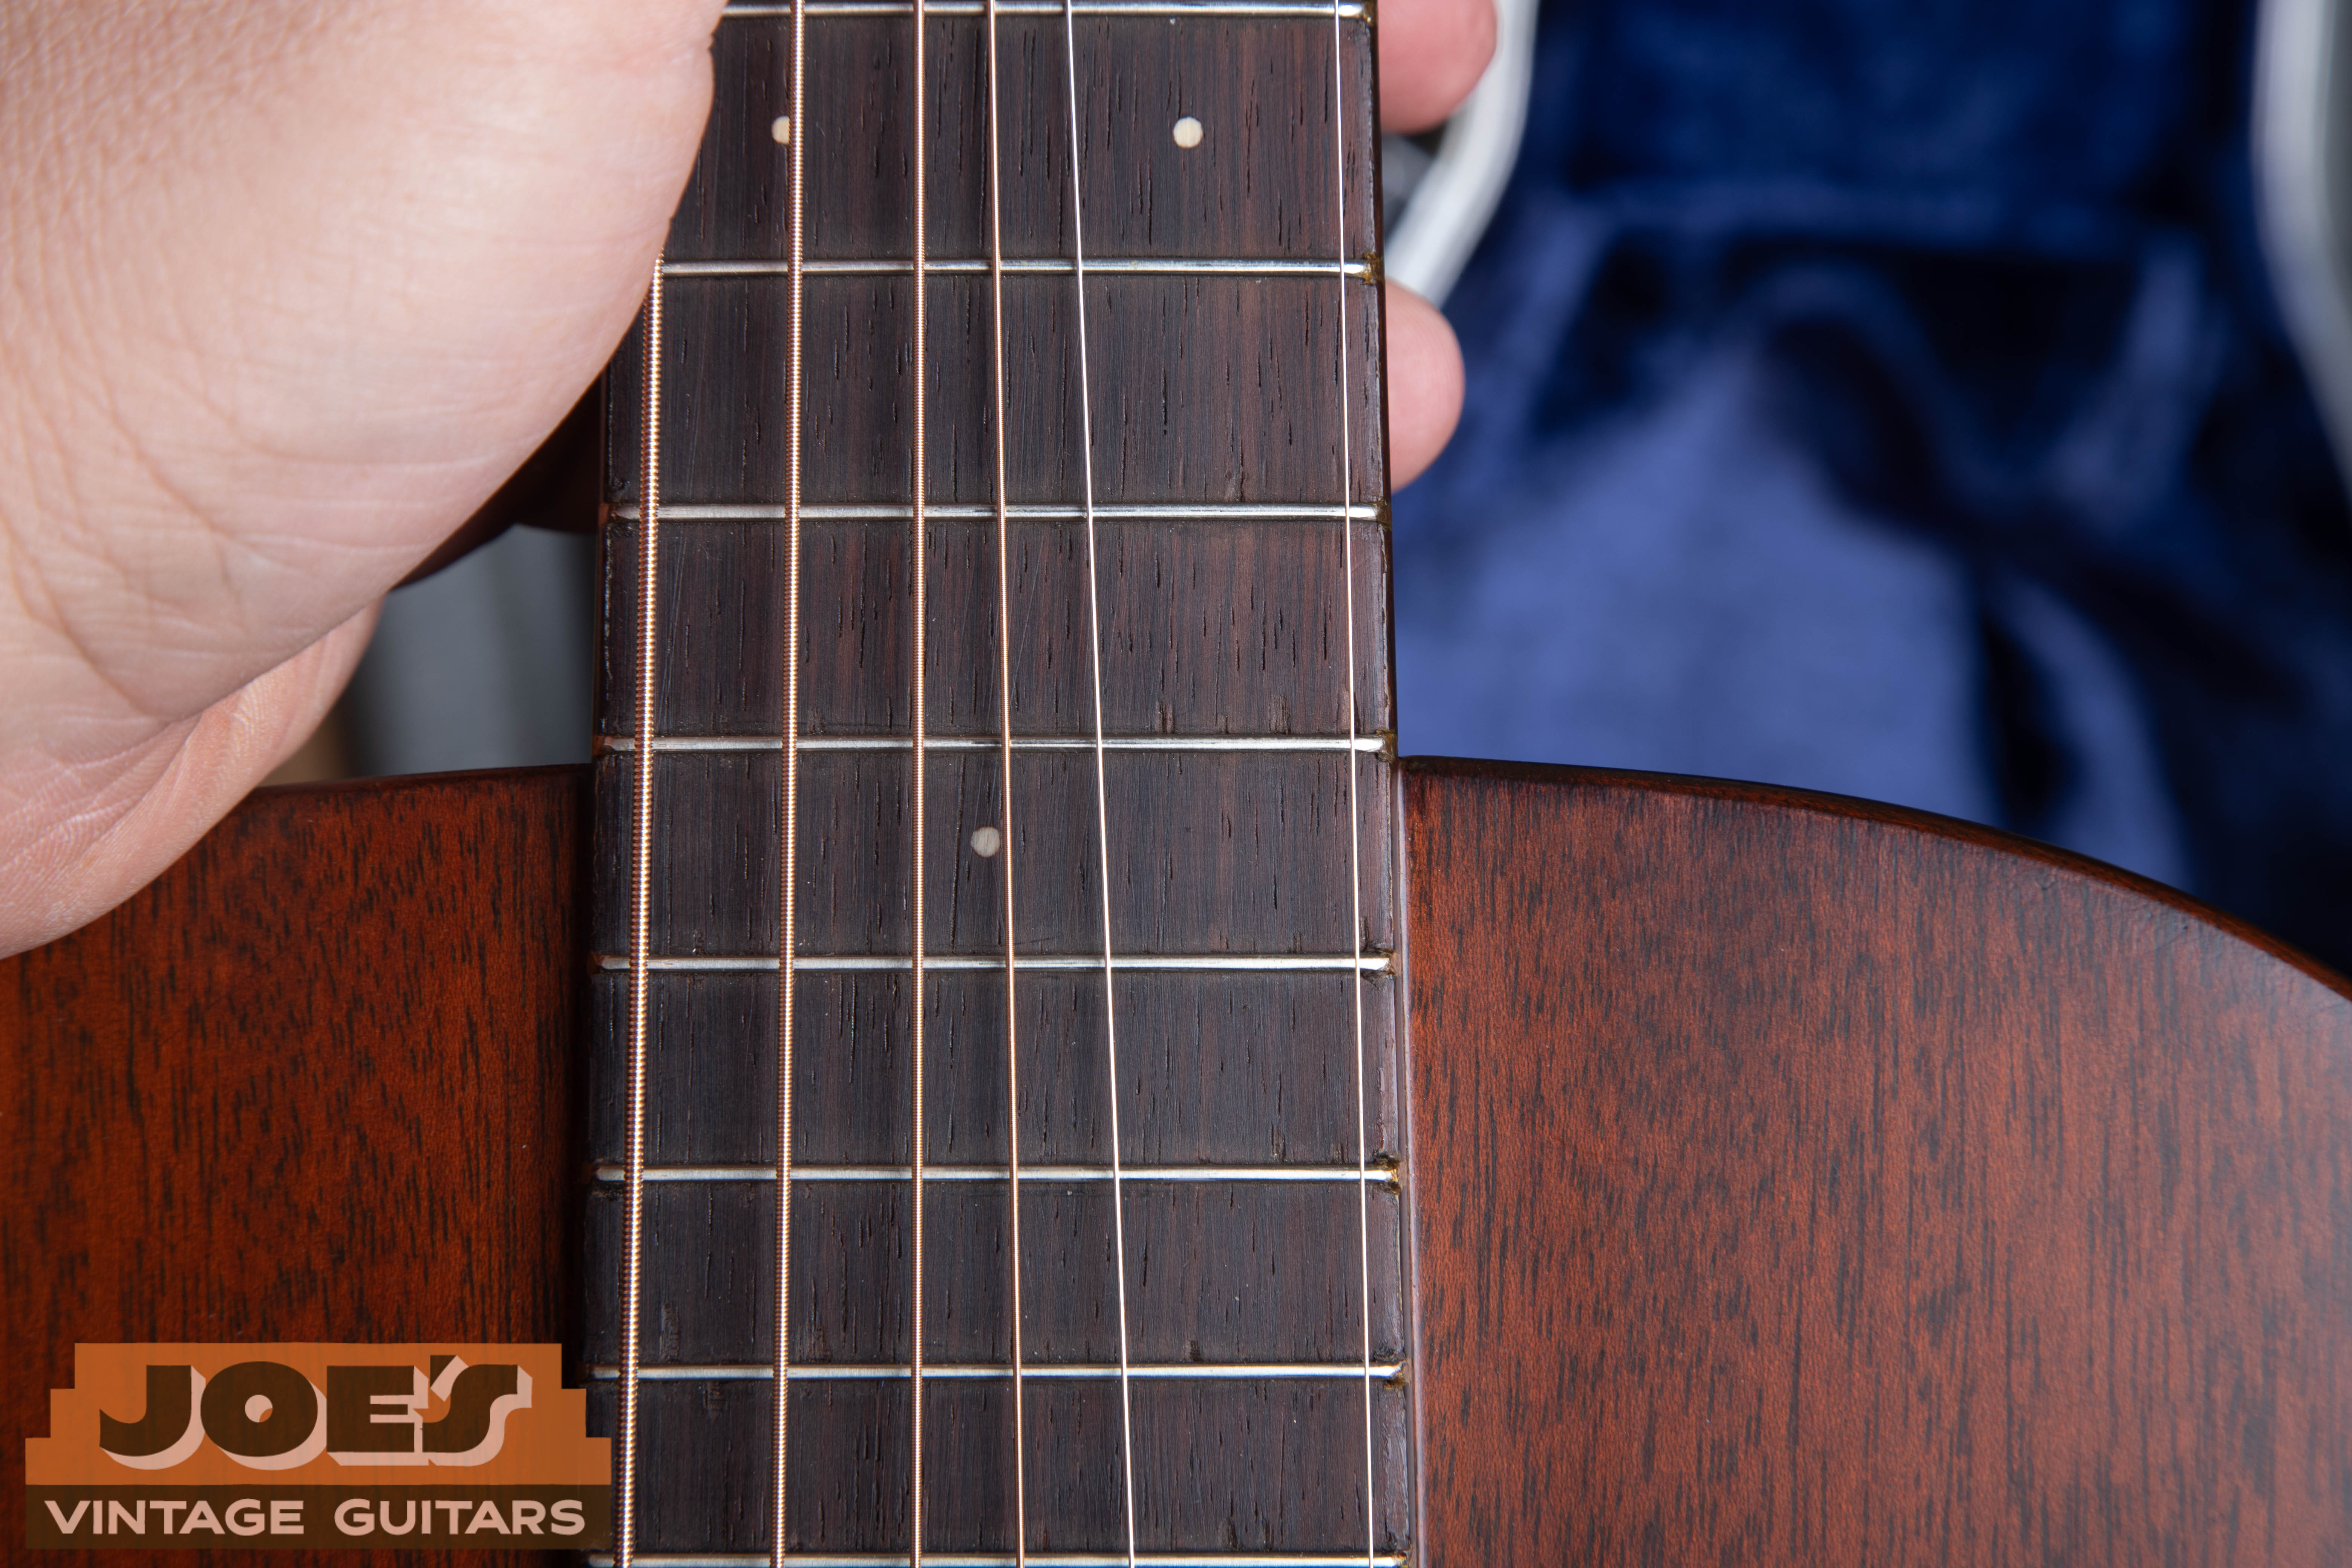
Martin changed from bar frets to T-frets on many models during 1934. Refretting can alter that evidence. The photographed 0-17 below clearly shows its round markers and visible fret crowns; this view alone does not establish the shape of the metal hidden in each fret slot.
A bar fret is a rectangular strip with its exposed top rounded for playing. A T-fret has a wider crown above a narrower tang. The tight fit of bar frets also helps control neck relief. A conversion between fret types therefore involves more than changing the feel under your fingers.
If refret work is documented, record the installed fret type and any fingerboard or reinforcement changes. Don’t infer the original neck system from a newly installed set of frets.
Ebony Reinforcement And Steel T-Bars
Martin introduced steel T-bar neck reinforcement with the move to T-frets in 1934. Wartime shortages brought ebony reinforcement back on many guitars, followed by a postwar return to steel. The serial and model help narrow which system to expect.
These bars are hidden inside the neck and are not adjustable truss rods. A soundhole photograph does not reveal their cross-section. Ask for repair documentation rather than assigning a bar type from an exterior view.
The return to steel wasn’t a single clean boundary. Ebony reinforcement also appeared in 1945 and 1946, plus some late-1953 production. Some shop-order entries are ambiguous. Check the individual instrument or repair record before describing a wartime or early-postwar neck as certainly steel or ebony.
Model Woods, Herringbone And Pearl Trim
Prewar D-18s have mahogany backs and sides with plainer Style 18 appointments. D-28s use Brazilian rosewood and herringbone top trim. The original D-45 run, made from 1933 to 1942, adds extensive pearl decoration. Confirm the style from the guitar and records before comparing value.
Herringbone outlasted the change away from scalloped bracing. It also returned on later models, including the HD-28. Pearl, herringbone and a historic model name are not enough to establish a prewar production date.
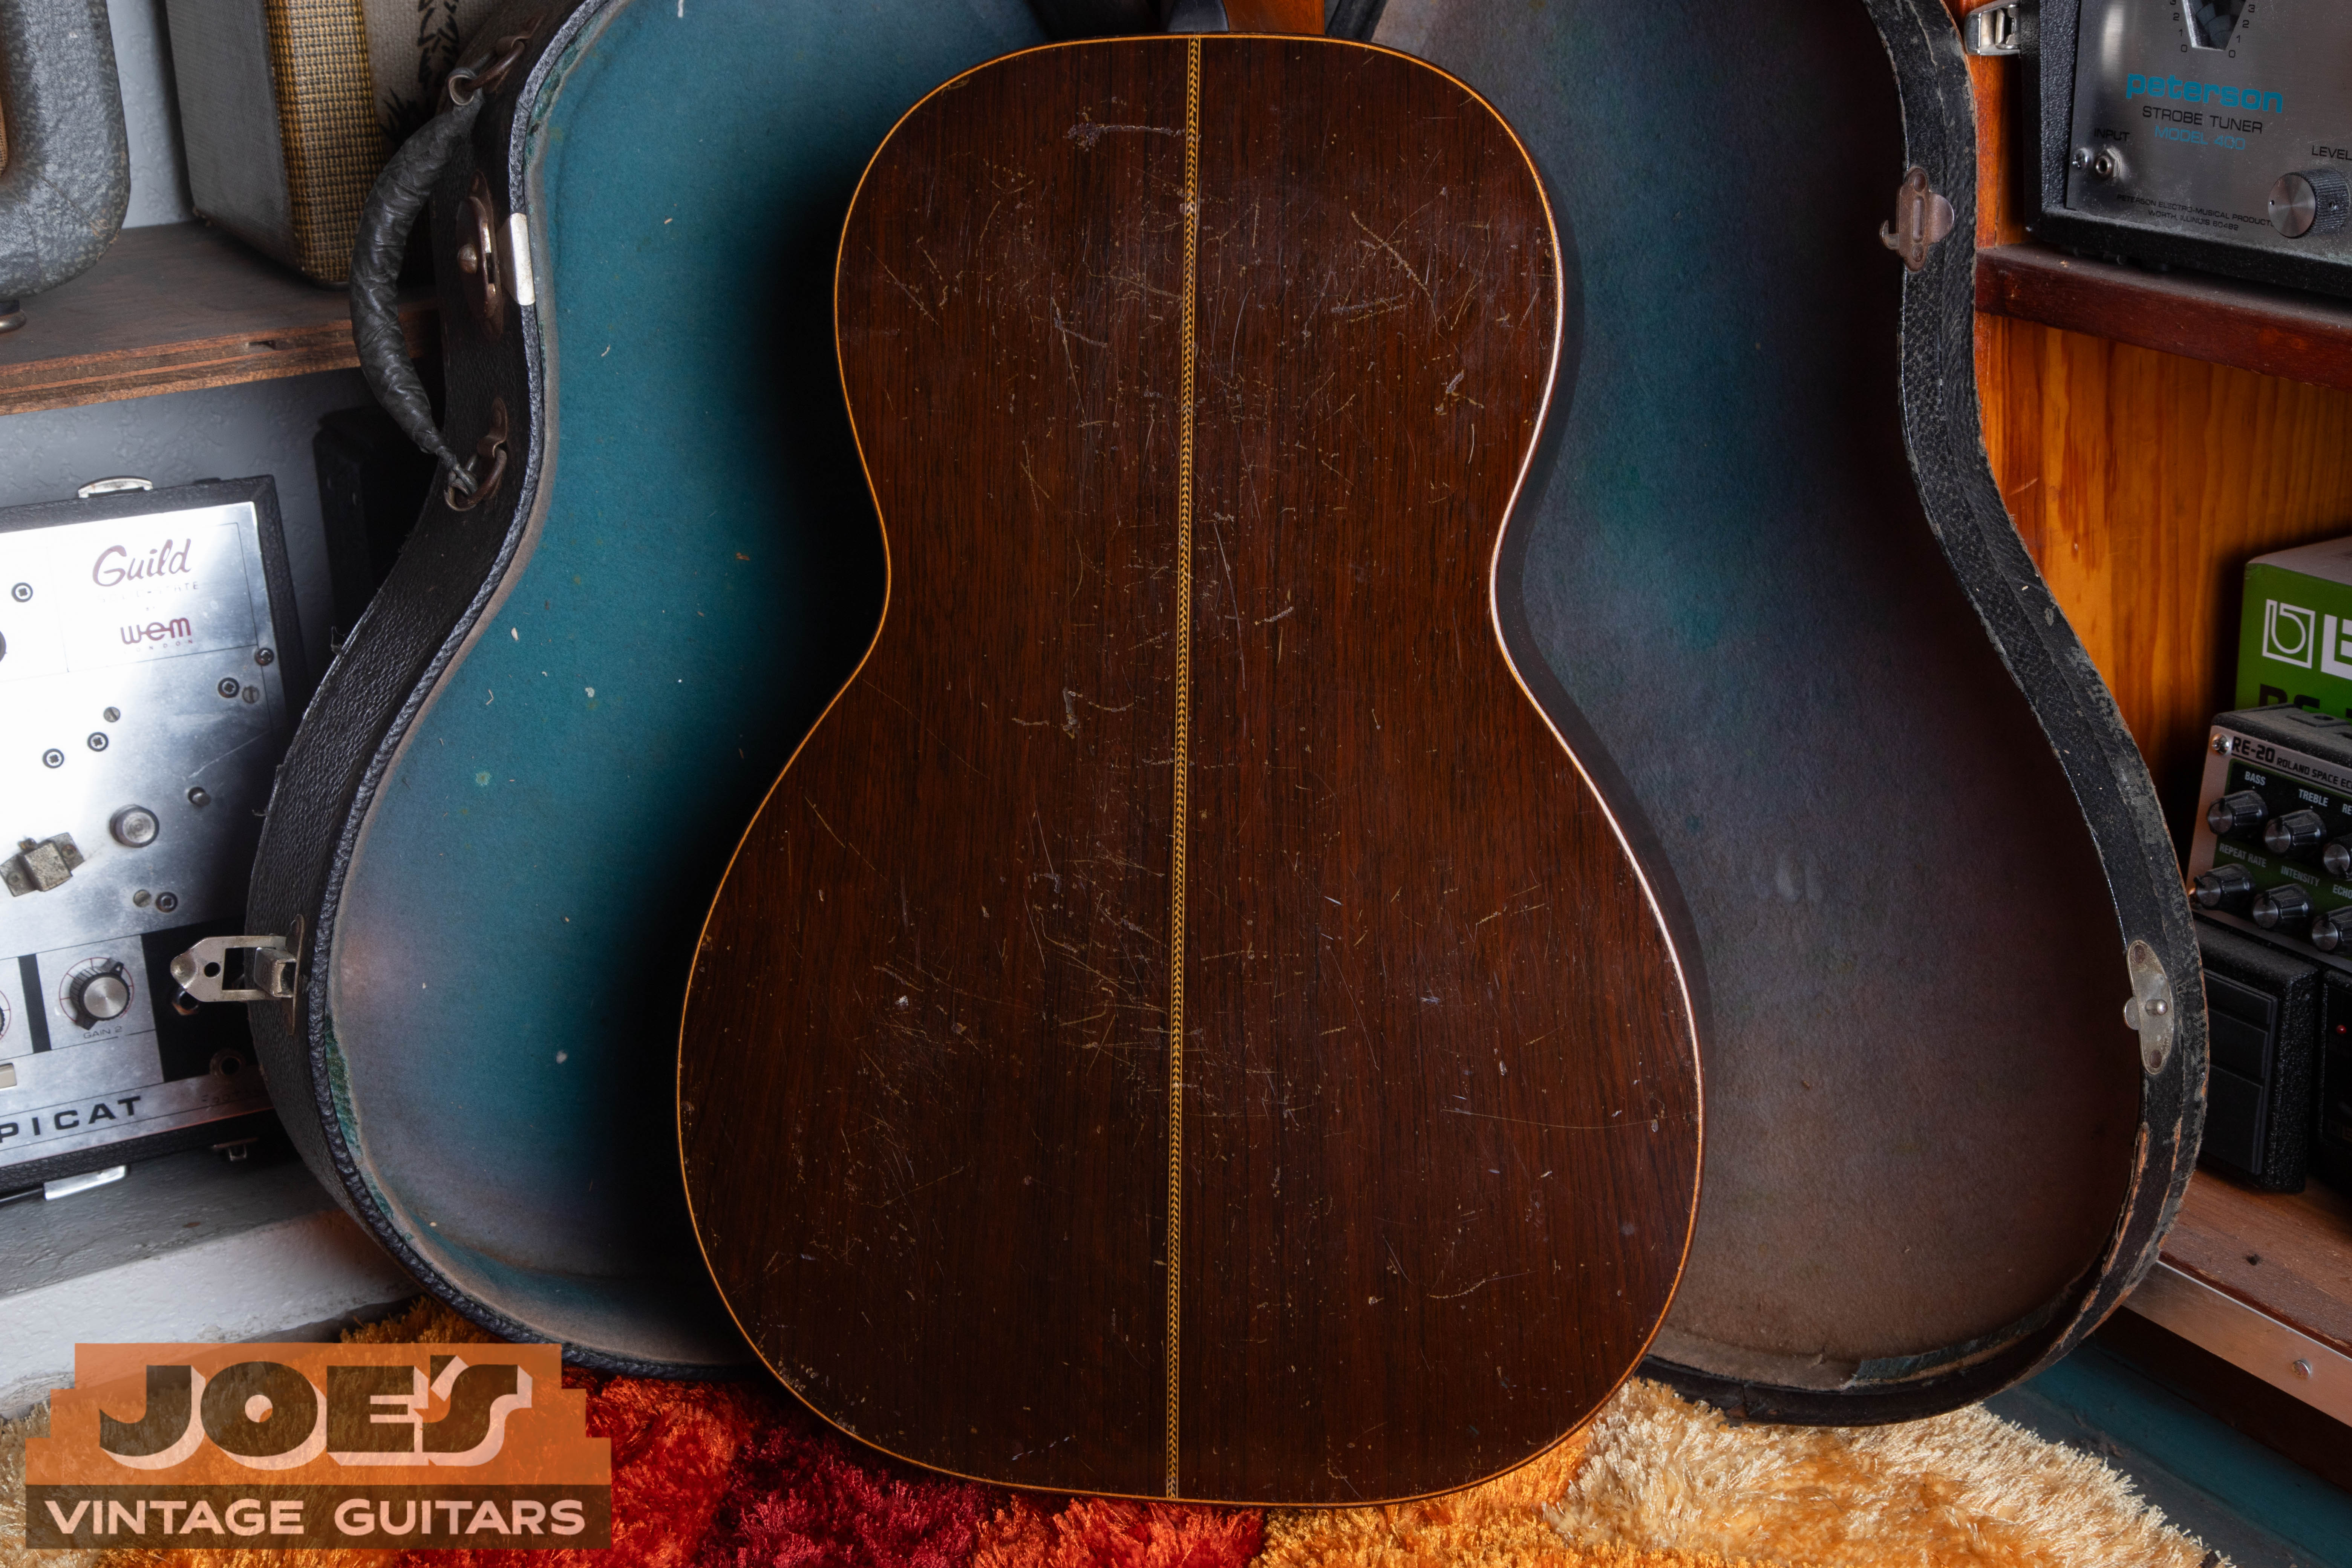
The 1930 0-21 below has Brazilian rosewood. Wood identification needs the model and history as well as grain; finish and lighting can change its appearance.
Bridge Shape, Original Parts And Repair History
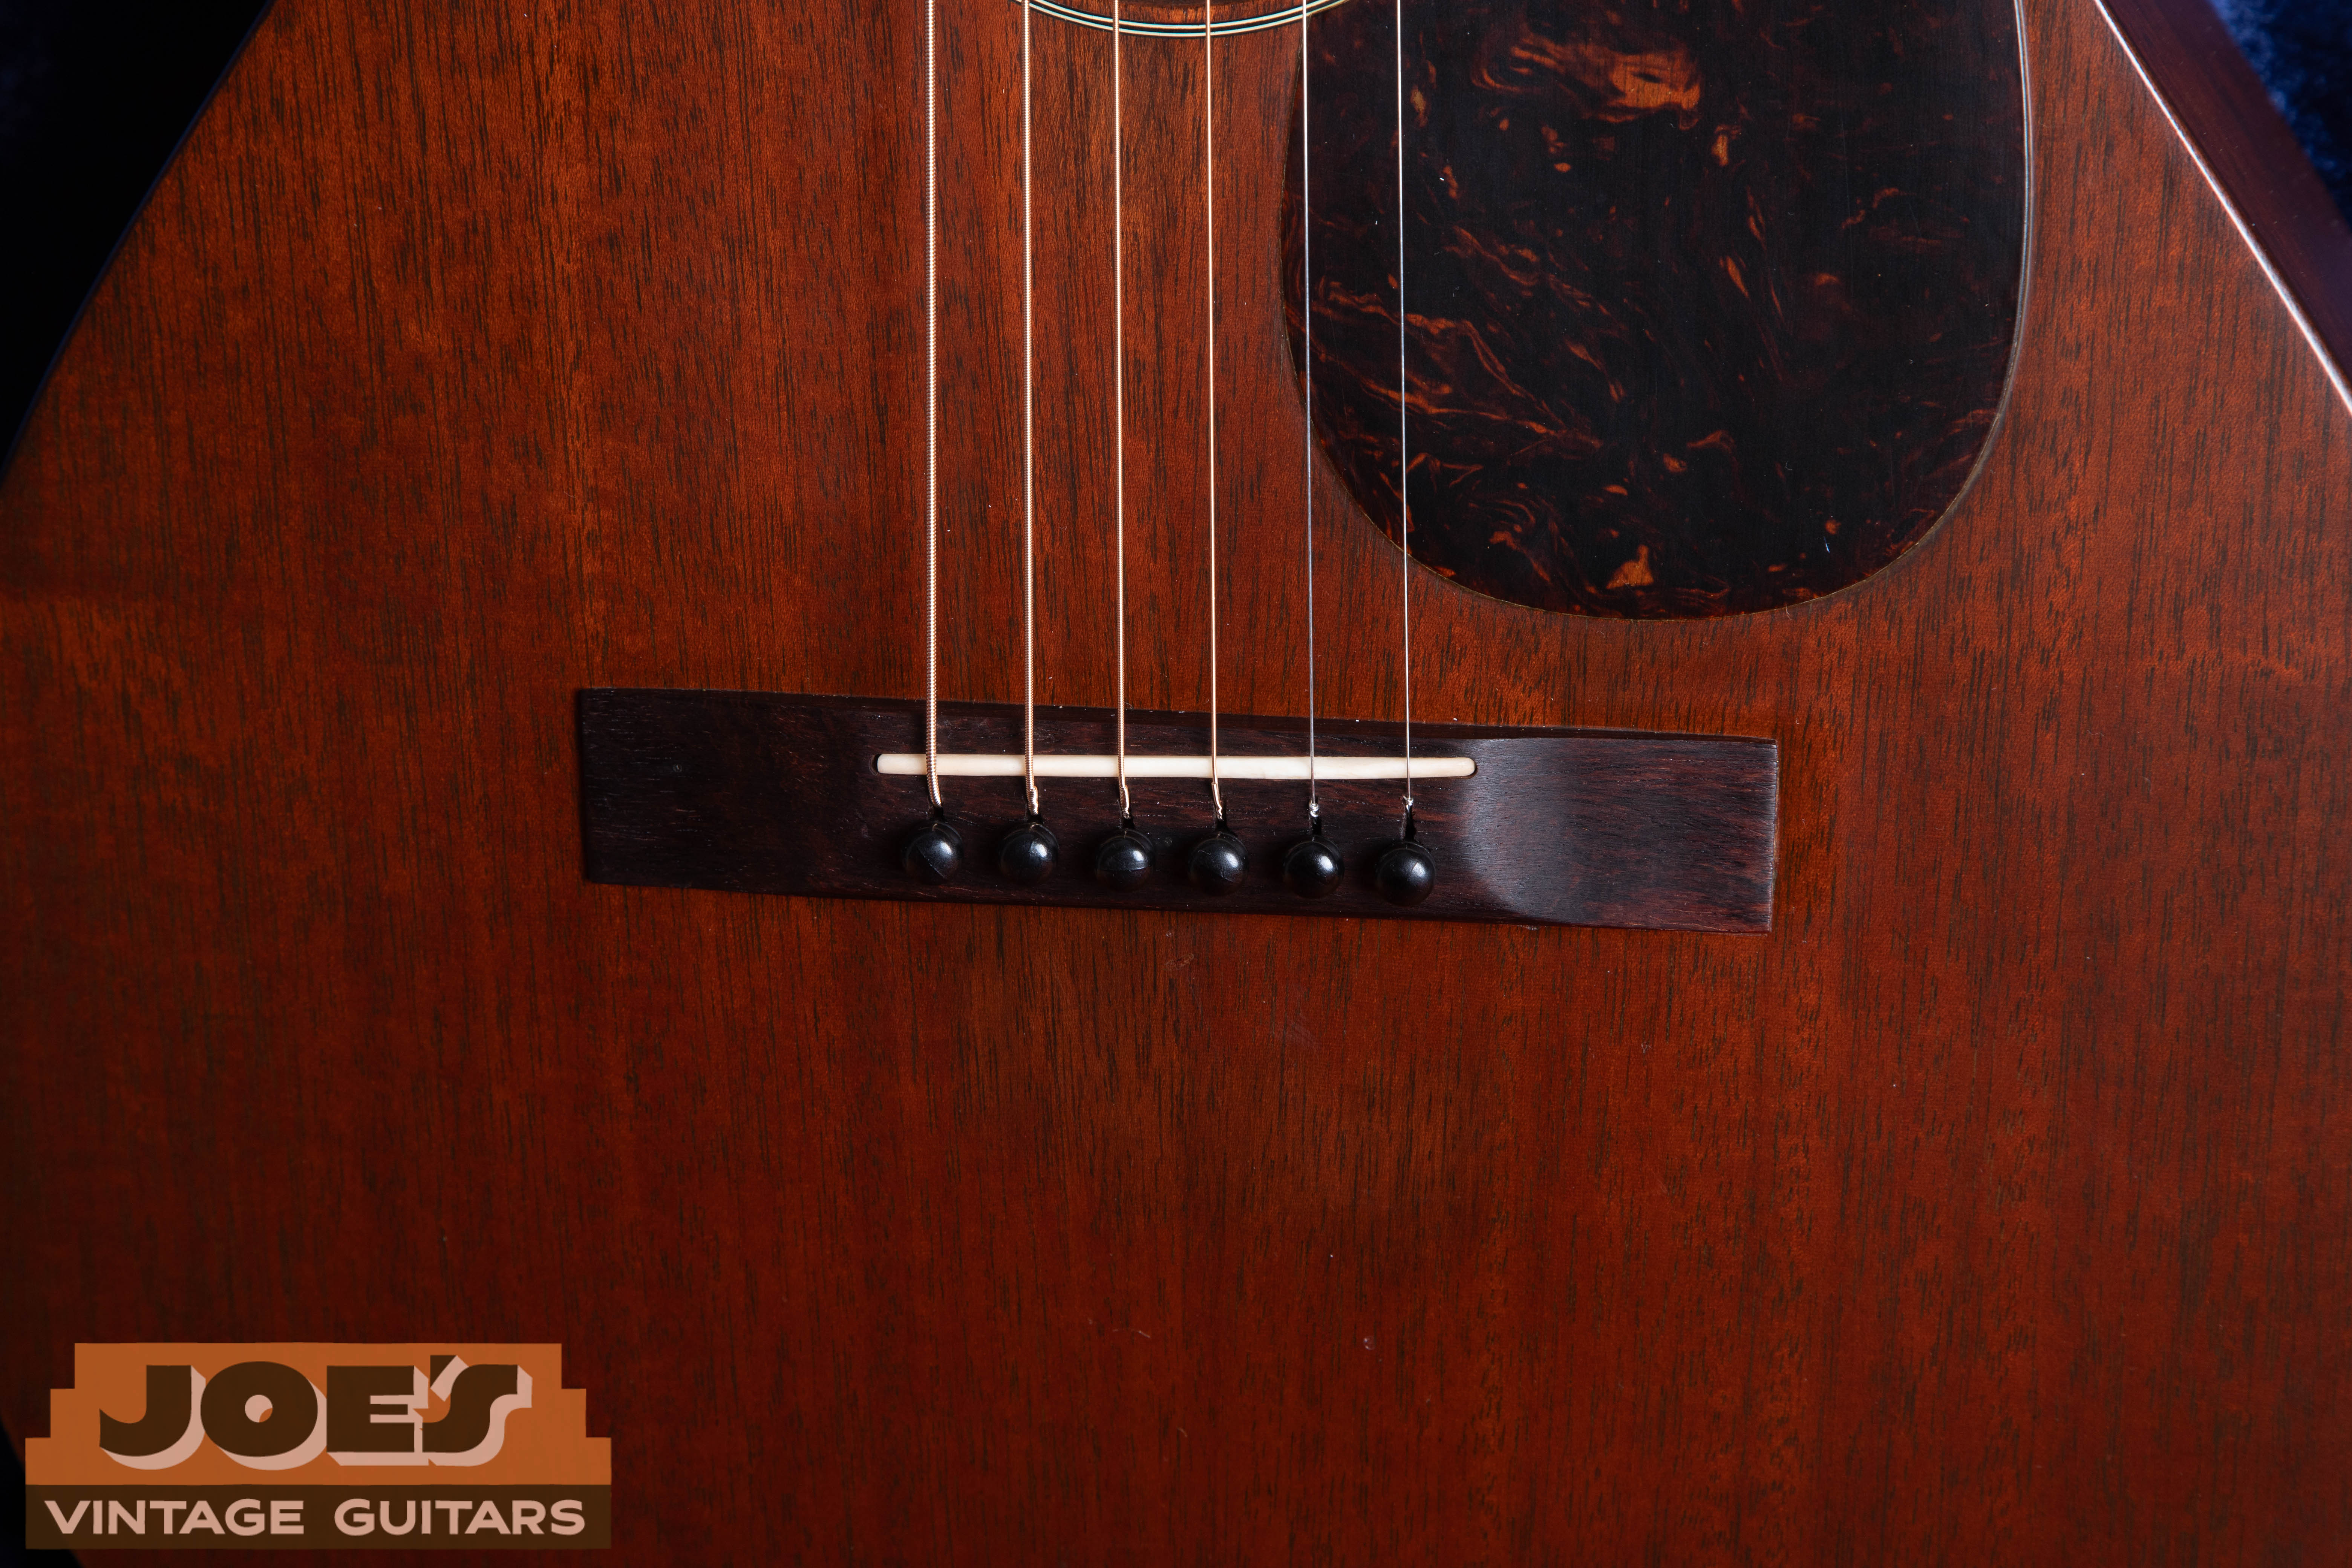
A bridge’s outline and saddle arrangement are separate details. The rectangular bridge on this 1937 0-17 differs from the belly bridge on Joe’s 1930 0-21. Match the exact model rather than treating every rectangular bridge as older than every belly bridge.
Check for an enlarged bridge footprint, altered saddle slot, repaired top and documented bridge replacement. Record neck resets, refrets and finish work separately. A repaired prewar guitar retains its production year, but its installed parts may be much newer.
An early serial with a belly bridge deserves investigation before a replacement verdict. Some unsold late-1920s guitars received newer bridges at the factory before sale, and dealer stock was returned for updates. Look for records that separate factory work from later repairs.
Photos And Records For A Prewar Martin Assessment
Start with clear overall photographs, then document the details that can confirm or contradict the serial date. Have a repairer photograph the interior if the X crossing or brace profiles are difficult to capture.
- Full front and back, plus the complete model and serial stamp.
- Front and rear headstock, tuners and any unused mounting holes.
- Body joint, fingerboard, nut-width measurement and fret detail.
- Complete bridge, saddle, pickguard and surrounding finish.
- X-brace crossing with a scale, brace profiles and the entire bridge plate.
- Repair invoices, older photographs, case records and ownership history.
Prewar And Wartime Martin Construction Timeline
Use these transitions with the model and physical evidence. The chart includes the postwar changes needed to distinguish a later guitar from a prewar example.
| Period | Change To Compare | Exceptions And Repairs |
|---|---|---|
| Around 1929 | The OM brings the 14-fret body joint. | 12-fret instruments continue alongside it. |
| Around 1930 | Belly bridges appear; model stamps become routine late in the year. | Rectangular bridges and serial-only blocks overlap the transition. |
| Late 1934 | T-frets replace bar frets on many standard models. | Some Hawaiian models retain bar frets; later refrets can change the evidence. |
| 1938 | Dreadnought X-bracing moves farther from the soundhole. | Compare brace position separately from scalloping; small-body changes followed different schedules. |
| 1939 | Many 14-fret necks narrow from 1 3/4 inches to 1 11/16 inches at the nut. | 12-fret models and later recreations need their own specifications. |
| Late 1944 To Late 1940s | Scalloped bracing gives way to tapered, then straighter profiles. | Inspect the interior; altered braces cannot date themselves. |
| 1946 To Early 1947 | 1946 is the last full year of the original Style 28 herringbone trim; some early 1947 guitars retain it. | Later HD and vintage-style models revive herringbone. |
Frequently Asked Questions
What Years Are Considered Prewar Martins?
Collectors commonly mean 1930s guitars and sometimes include wartime examples with scalloped braces through the late-1944 transition. Record the exact production year and model because prewar is not one fixed factory specification.
Does Every Prewar D-28 Have Forward-Shifted Bracing?
No. Dreadnought bracing moved rearward during 1938 while scalloped brace profiles continued. Position and carving are separate features.
Can Scalloped Bracing Prove A Martin Is Prewar?
No. Later factory models also use scalloped braces, and braces can be shaved during repairs. Check the serial, model, complete brace layout and repair history.
Is A 1946 Herringbone D-28 The Same As A 1930s D-28?
No. Herringbone remained after the late-1944 bracing transition. Compare the actual braces, neck dimensions and repairs before grouping those guitars together.
Can I Identify A Neck T-Bar Through The Soundhole?
No. A nonadjustable T-bar is hidden in the neck. The absence of a visible adjustment point does not distinguish it from ebony reinforcement.
What Photos Are Needed To Check Prewar Bracing?
Include the complete X crossing and soundhole edge with a scale, views along the brace profiles, and the full bridge plate. A close-up of one tone bar cannot establish the position of the X crossing.
Related Martin Dating Guides
Use the guides below to compare your Martin’s serial number, model stamp, logo, tuners and construction.
- Martin Headstock Logo Evolution And Dating Guide
- Martin Tuner Dating Guide: Grover, Kluson And Waverly
- Martin Neck-Block Stamps: Models, Serials And Maker’s Marks
- Martin Guitar Construction Features And Dating
- Martin Guitar Model Numbers: Body Sizes And Styles
If a stamp, logo or part doesn’t fit the guitar, use the Martin counterfeit identification guide to check the whole instrument.

Talk With
Joe Today
Have a vintage guitar to sell or a question? I’m here to help.