

Original Twin Family · 1952 Through 1980
Fender Twin And Twin Reverb Identification
Read the cabinet, circuit and component evidence together, from the first tweed Twins to the high-power silverface Twin Reverb.
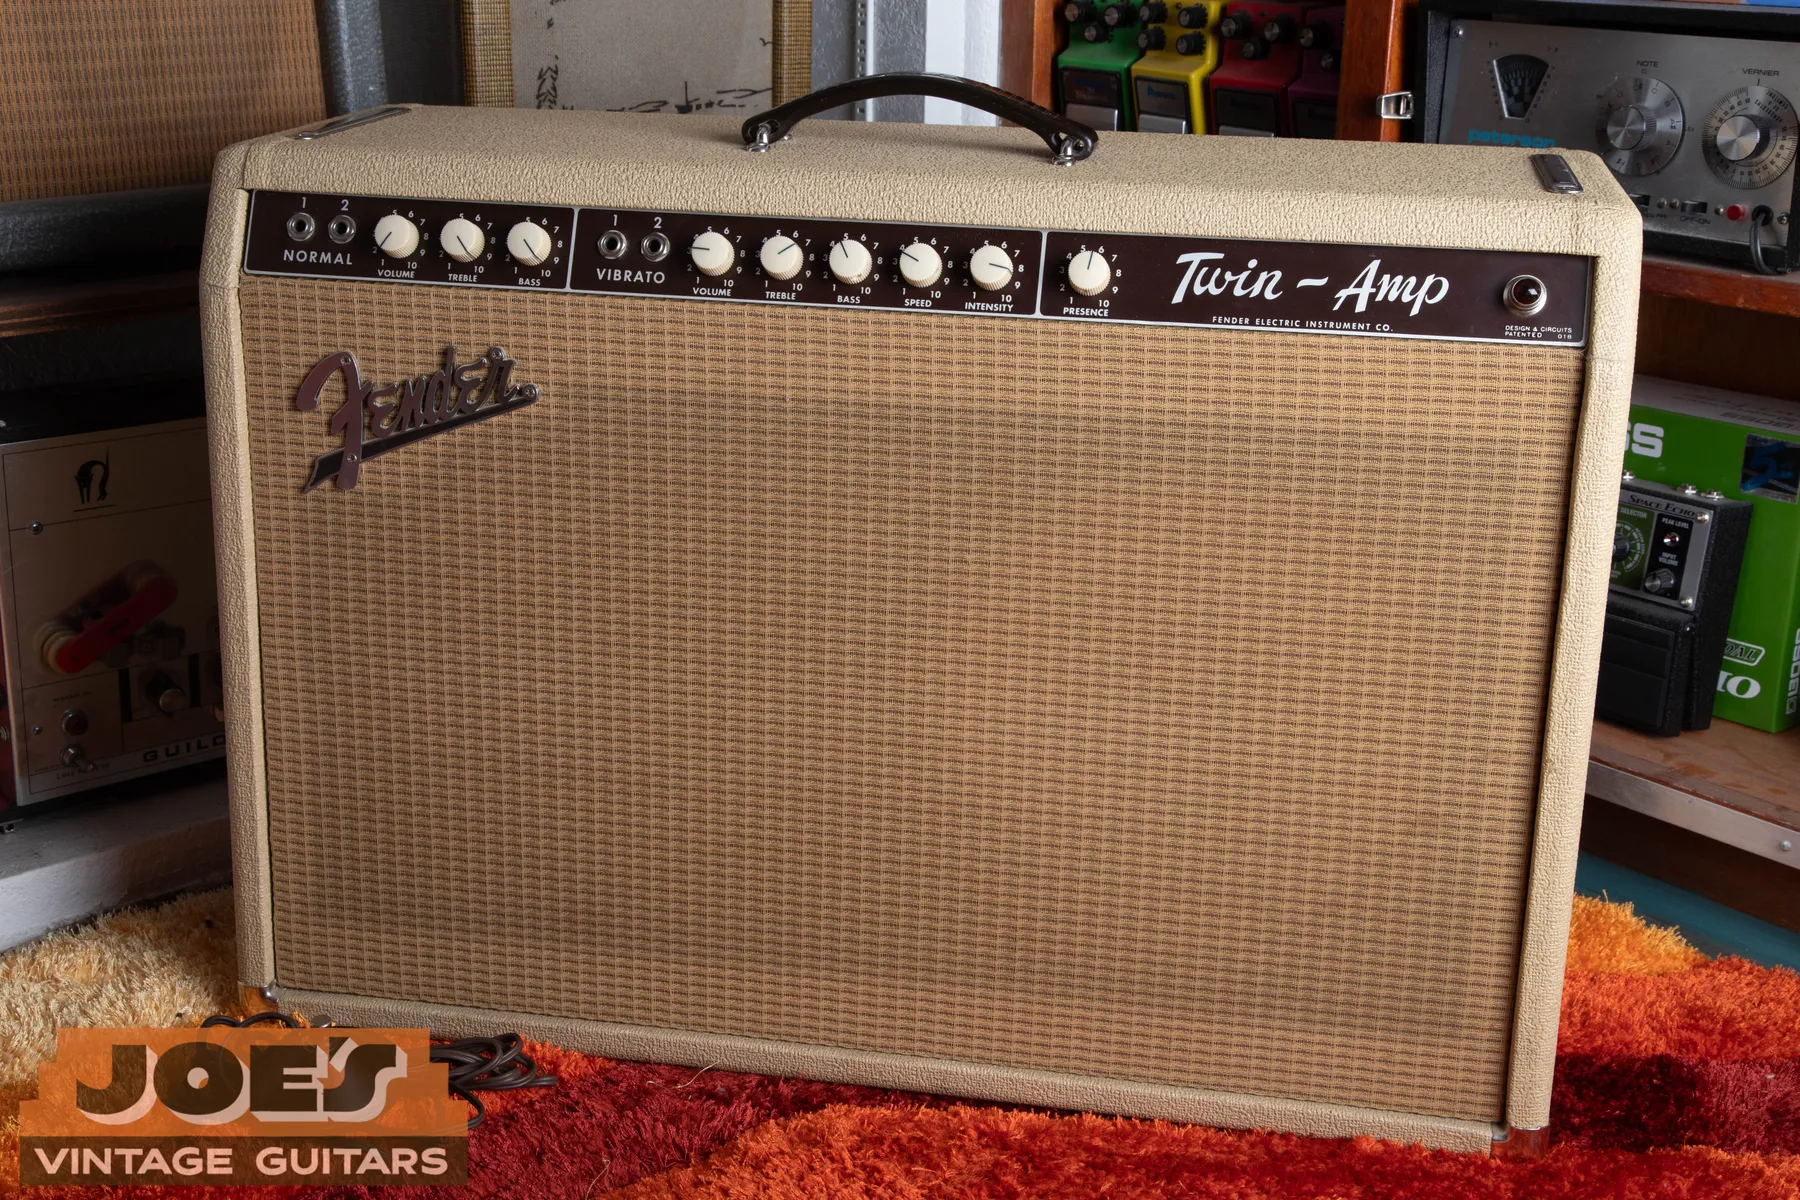
Identify a Fender Twin by its generation before trying to date it. The tweed Twin, blonde Twin and Twin Reverb have distinct circuits and control layouts. The Twin value guide prices those versions separately. Here, the photographs show what to inspect: model lettering, control arrangement, speaker complement, tube chart and transformer markings. A black or silver faceplate supplies a useful visual clue, while the chassis and dated parts establish a more complete description.
Authenticity And Originality Are Assessed From The Information Provided. A Hands-On Inspection Can Change The Conclusion.
Modern Twins Can Look Familiar
Original Or Reissue? Start At The Back
The modern ’65 Twin Reverb uses PCB assemblies identified in Fender’s service manual. A technician can distinguish those boards from an original eyelet-board circuit. The ’68 Custom Twin Reverb has Custom and Vintage channel labels and two Celestion G12V-70 speakers in its standard configuration. Read the rear model identification and compare it with the correct Fender manual before treating the styling as age evidence. Modern production speakers and transformers need to be dated themselves; a period-looking label alone can’t authenticate the complete amp.
The ’57 Custom Twin-Amp is handwired and uses a tweed-covered pine cabinet with two twelve-inch Eminence speakers. That construction makes “handwired” an insufficient vintage test. Original and modern examples must be distinguished by the complete chassis, labels and component history. A technician can compare construction with the relevant factory drawing without relying on how old the covering looks.
A Tone Master Twin Reverb has digital electronics and rear features including a USB connection, balanced XLR output and selectable output power. Those controls identify a modern family immediately. It has no vintage tube complement to date. Later Twin designs, including the post-1980 redesigns, also fall outside this guide’s original-era coverage.
Model History
Twin Changes From Tweed To High Power
Tweed Twin Development
Fender’s first Twin appeared in 1952. Wide-panel and narrow-panel cabinets accompanied several circuit revisions. The family progressed from the early 25-watt model through the 5E8-A and higher-powered 5F8-A designs. Those circuit names distinguish electrical versions that a front view alone can’t settle.
Brown And Blonde Twin
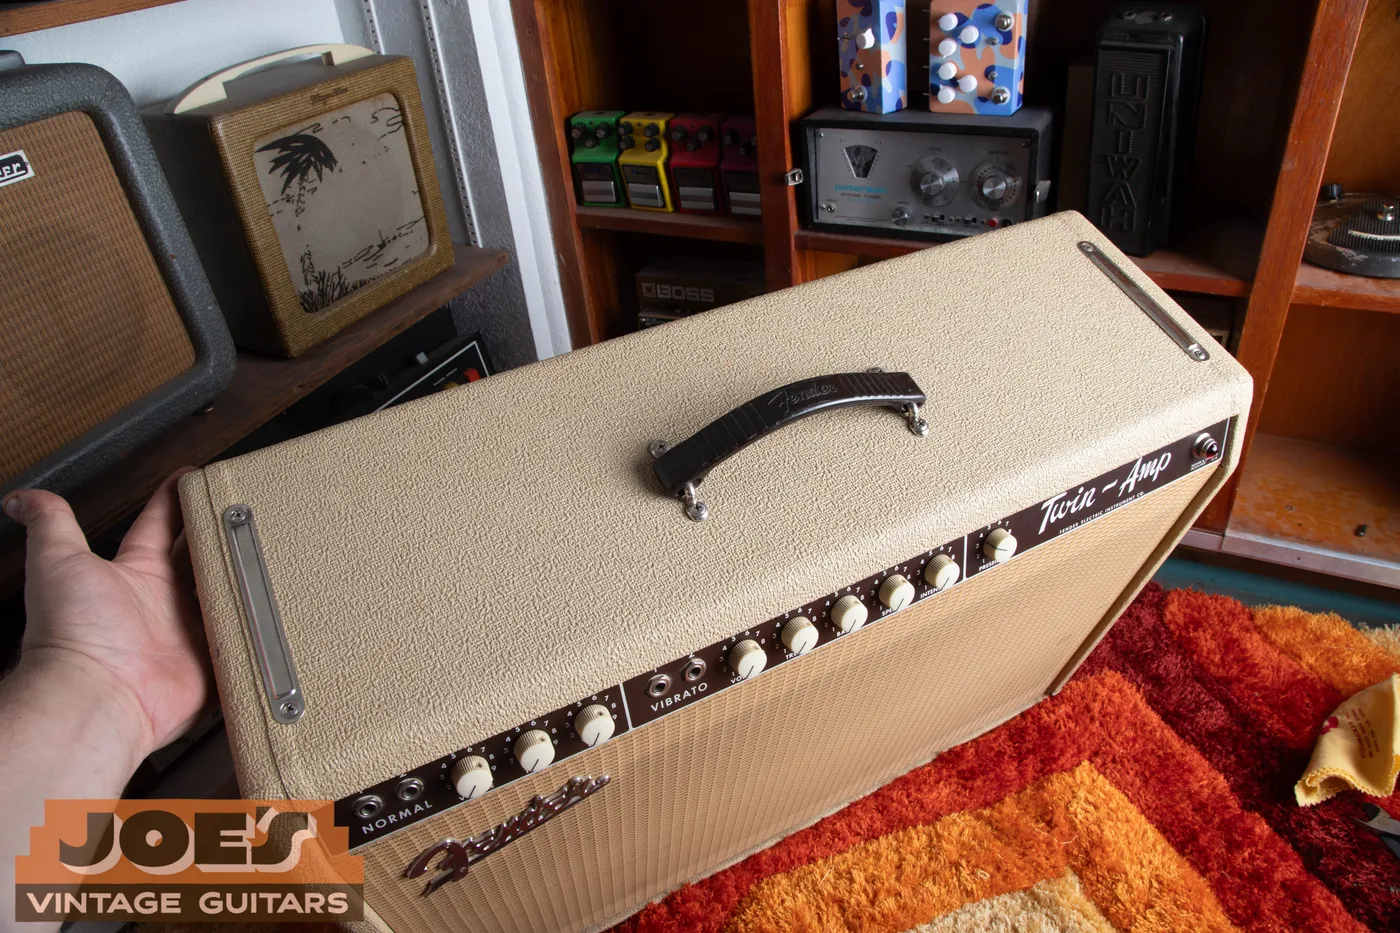
The transitional Twin family moved into brown and blonde cosmetics. The 6G8 and 6G8-A circuits added the characteristic multi-control arrangement and tremolo, with four output tubes. Joe’s blonde 1963 example has white barrel knobs, a brown control panel and a 6G8-A paper chart.
Twin Reverb Arrives
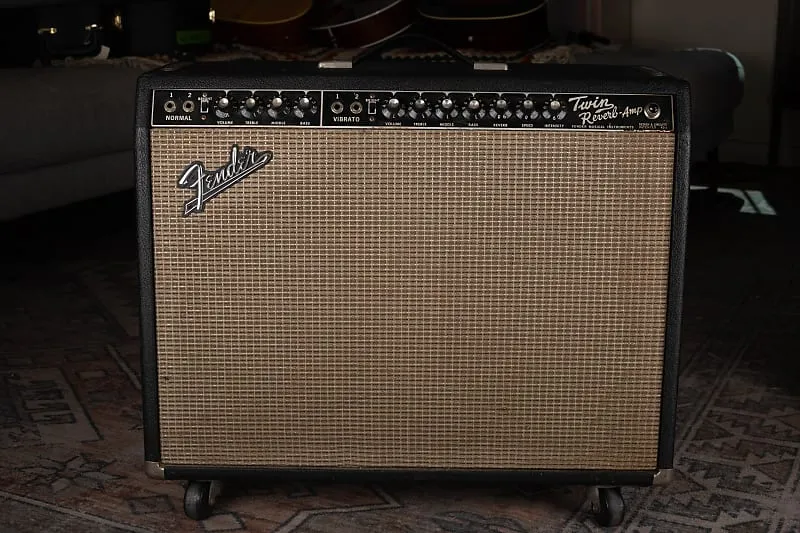
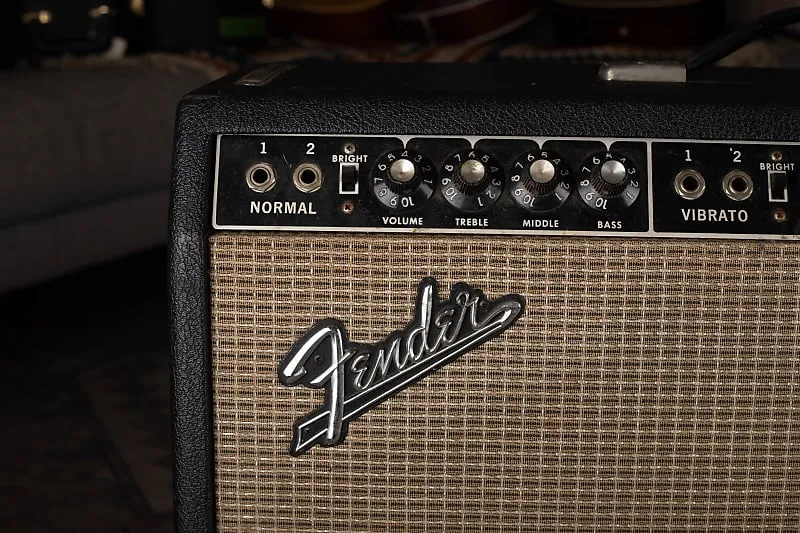
The blackface Twin Reverb introduced built-in spring reverb in the AB763 family. It has Normal and Vibrato channels, bright switches and separate tone controls. Its two-speaker format continued, while the reverb equipment and control layout distinguish it from the preceding blonde Twin.
Silverface Changes In Stages
The silverface era begins in 1967. Early Twin Reverbs received a silver panel and aluminum grille surround before all electrical revisions occurred. Master volume arrived in 1972; subsequent versions added a pull function. The 135-watt ultralinear version followed in 1977. A late black-panel appearance requires component dating rather than an automatic earlier date.
Match The Complete Configuration
Twin Circuit And Hardware Comparison
| Version / Circuit | Output And Tubes | Rectifier / Speakers | Controls | Cabinet Details |
|---|---|---|---|---|
| Early Tweed / 5C8 | About 25 W; two 6L6-family output tubes; three 6SC7 and one 6J5 | 5U4 rectifier; two 12-inch speakers | Normal and Bright volume; bass and treble | Tweed; wide panels; brown grille; chrome top panel; chicken-head knobs; leather handle |
| Narrow Tweed / 5E8-A, 5F8-A | About 50 W, then 80 to 100 W; two then four 6L6-family output tubes. 5E8-A: three 12AY7 plus one 12AX7; 5F8-A: one 12AY7 plus two 12AX7 | 5E8-A: two 5U4; 5F8-A: GZ34; two 12-inch speakers | Two volumes; treble, bass, presence; later middle control | Narrow tweed panels; dark grille; chrome top panel; script badge; black chicken-head knobs; leather strap |
| Blonde / 6G8, 6G8-A | 80 to 100 W; four 6L6GC/5881; six 12AX7/7025-family small tubes | Solid-state rectifier; two 12-inch speakers | Normal and Vibrato channels; tone controls; speed, intensity, presence | Blonde covering; oxblood or wheat grille; brown panel; flat script logo; white barrel knobs; strap handle |
| Blackface Twin Reverb / AB763 | 85 W; four 6L6GC; four 12AX7/7025 plus two 12AT7 | Solid-state rectifier; two 12-inch speakers | Two channels with bright switches; reverb; speed and intensity | Black covering; silver grille; black panel and skirted knobs; raised logo; black strap; tilt-back legs |
| Silverface Twin Reverb | 100 W in later standard versions; 135 W ultralinear from 1977; four 6L6GC; six small tubes as above | Solid-state rectifier; two 12-inch speakers | Earlier layout; later master volume and pull function | Black covering; silver/blue grille with later variations; silver panel; skirted knobs; logo revisions; strap handle |
Ratings are nominal and depend on the documented version. 7025 is the low-noise 12AX7 family designation used on many original charts. Supply parts and transitional features require inspection of the individual amp.
Use the circuit designation as a comparison target for a technician, not a promise that the amplifier still follows the drawing. Repairs can change individual parts, and modifications can alter the operating circuit. A paper chart can also remain in a cabinet after a chassis swap. Record the label, chassis and installed components as separate pieces of evidence.
The output rating is another place where labels can mislead. A rear-panel power-consumption figure describes electricity drawn from the wall, not the audio power delivered to the speakers. Read the model’s documented output specification. Don’t turn a consumption marking into an advertising claim about amplifier wattage.
Readable Marks From Joe’s Archive
Date A Twin With Chart And Component Evidence
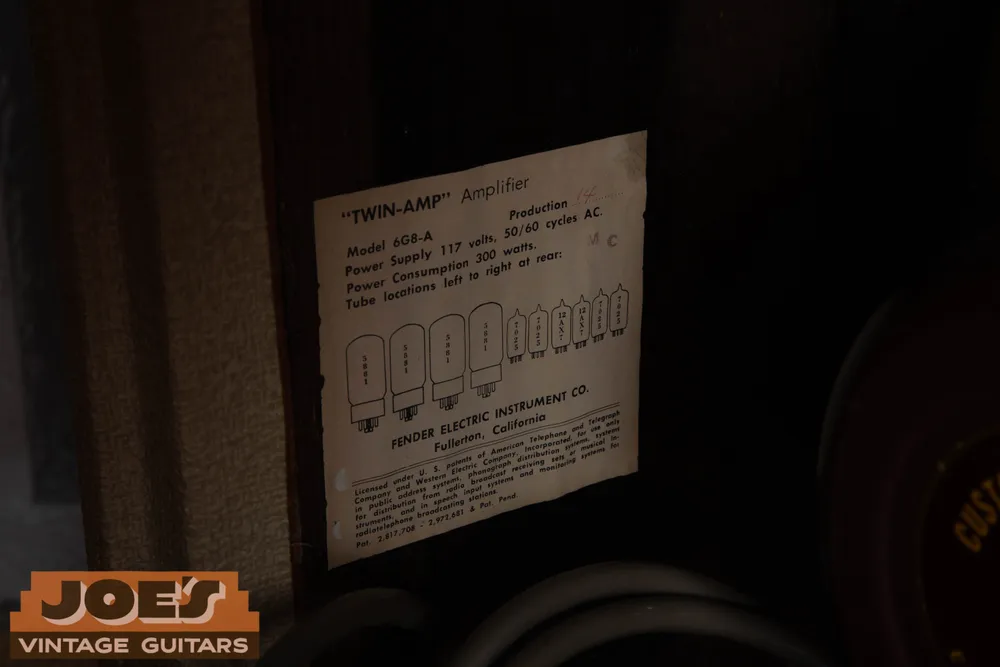
Joe’s Fender amp decoder reads the two-letter ink stamp used on tube charts until about 1970. The first letter gives the year beginning with A for 1951; the second gives the month. Keep the stamp separate from the printed circuit designation. The original chart should be photographed in place so its relationship to the cabinet remains visible.
When that paper is absent or the ink can’t be read, move to the transformer and speaker source-date section. Compare several original components instead of choosing the oldest number you can find. The pot-code guide supplies another reference for control markings. A component may predate final assembly, and a replaced part dates only itself.
March 1963 Tube-Chart Stamp
The ink stamp on Joe’s blonde Twin reads MC. Its printed 6G8-A designation identifies the circuit family. The production number elsewhere on the chart is a separate marking and isn’t used as the date.
A Component Date On The Choke
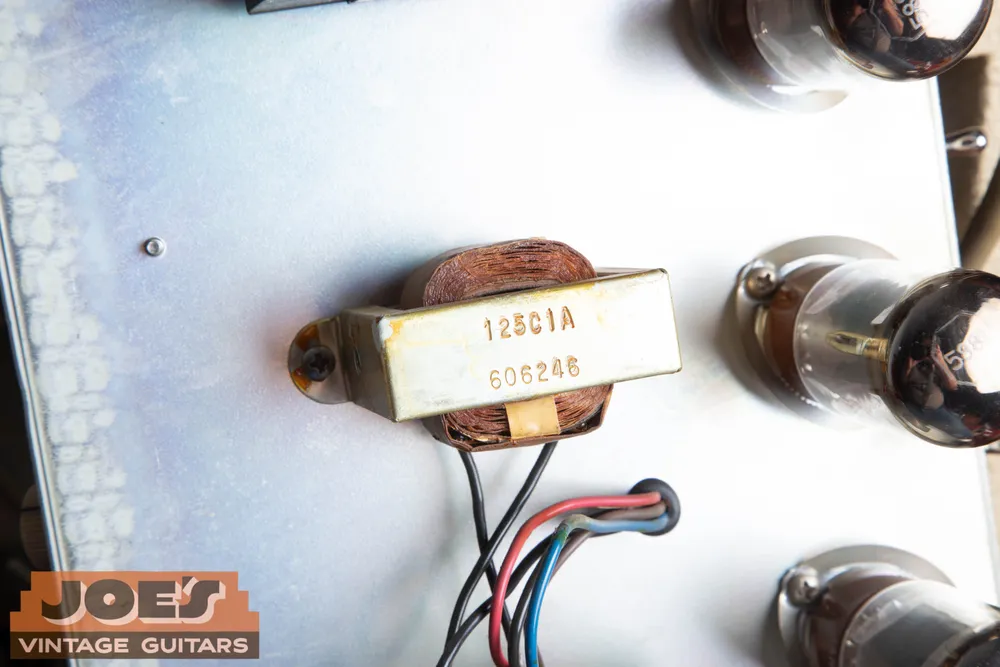
The choke photograph shows 125C1A above 606248. The first is the part designation; the second is the source-date stamp. Read it with the component-code reference and compare it with the chart and the remaining transformers before assigning an assembly period.
Eleven Areas To Document
Twin Originality Inspection
Power Transformer, Output Transformer And Choke
Record all three components, their mounting hardware and the way their leads enter the chassis. A matching period stamp helps, but solder work and extra mounting holes can reveal a later installation. Ask the technician to distinguish a replacement from a retained factory part.
The Speaker Pair
Inspect each speaker individually. Compare labels, frame stamps and cone evidence, and record any recone. A pair that looks alike from behind may have different service histories. Correct speaker type, period and installation all contribute to the assessment.
Filter Capacitors And Other Components
Request an interior service record showing which capacitors, resistors and wires changed. New filter capacitors can be maintenance; extensive circuit alterations need their own explanation. Avoid describing a serviced board as untouched simply because the amp remains handwired.
The Paper Tube Chart
Check the chart’s model wording, printed circuit and stamped date separately. Photograph tears, missing corners and its attachment. A reproduction chart can copy the appearance, so the paper must agree with the rest of the cabinet and chassis evidence.
Cabinet And Covering
Look for recovered surfaces, repaired joints and replacement baffles. Compare outside seams with safely visible inside edges. Light blonde covering can show wear clearly, while an attractive replacement can conceal the cabinet’s earlier condition.
Grille Cloth And Fender Logo
Record the cloth pattern, aluminum trim where appropriate and logo style. New grille material and reproduction logos are available, so cosmetic agreement needs supporting evidence. Note unused holes or a logo moved to a different position.
Faceplate And Knobs
Read all control labels, including master-volume and pull markings. Check whether controls match the chassis function. A replaced faceplate can change the apparent era while leaving the electrical design underneath unchanged.
Handle And Carrying Hardware
Photograph the strap, end brackets, tilt-back legs and added casters. Replacement carrying hardware should be listed without trying to make it look older. The cabinet around its screws may also show damage or an earlier mounting arrangement.
Reverb Tank And Footswitch
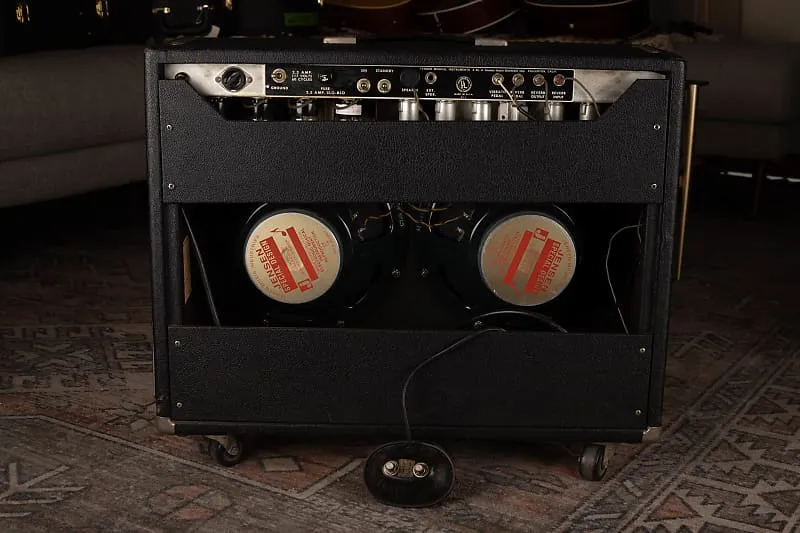
On a Twin Reverb, inspect the tank label, bag, leads and footswitch. Identify replacements explicitly. The earlier Twin’s lack of built-in reverb is part of its design, so use the model-specific equipment list.
Back Panels
Compare the panels with the cabinet, including covering, screw holes and wear. Missing or newly made panels affect completeness. A rear view should show the entire opening rather than only the speaker labels.
The Original Cover
Keep a surviving cover with the amp and photograph it separately. Distinguish an old cover with documented history from a modern reproduction. Its fit alone doesn’t establish when it was made or which amp it originally accompanied.
Joe’s Amplifier Archive
Twin Photo Timeline
Blonde Twin
1963 Fender Twin
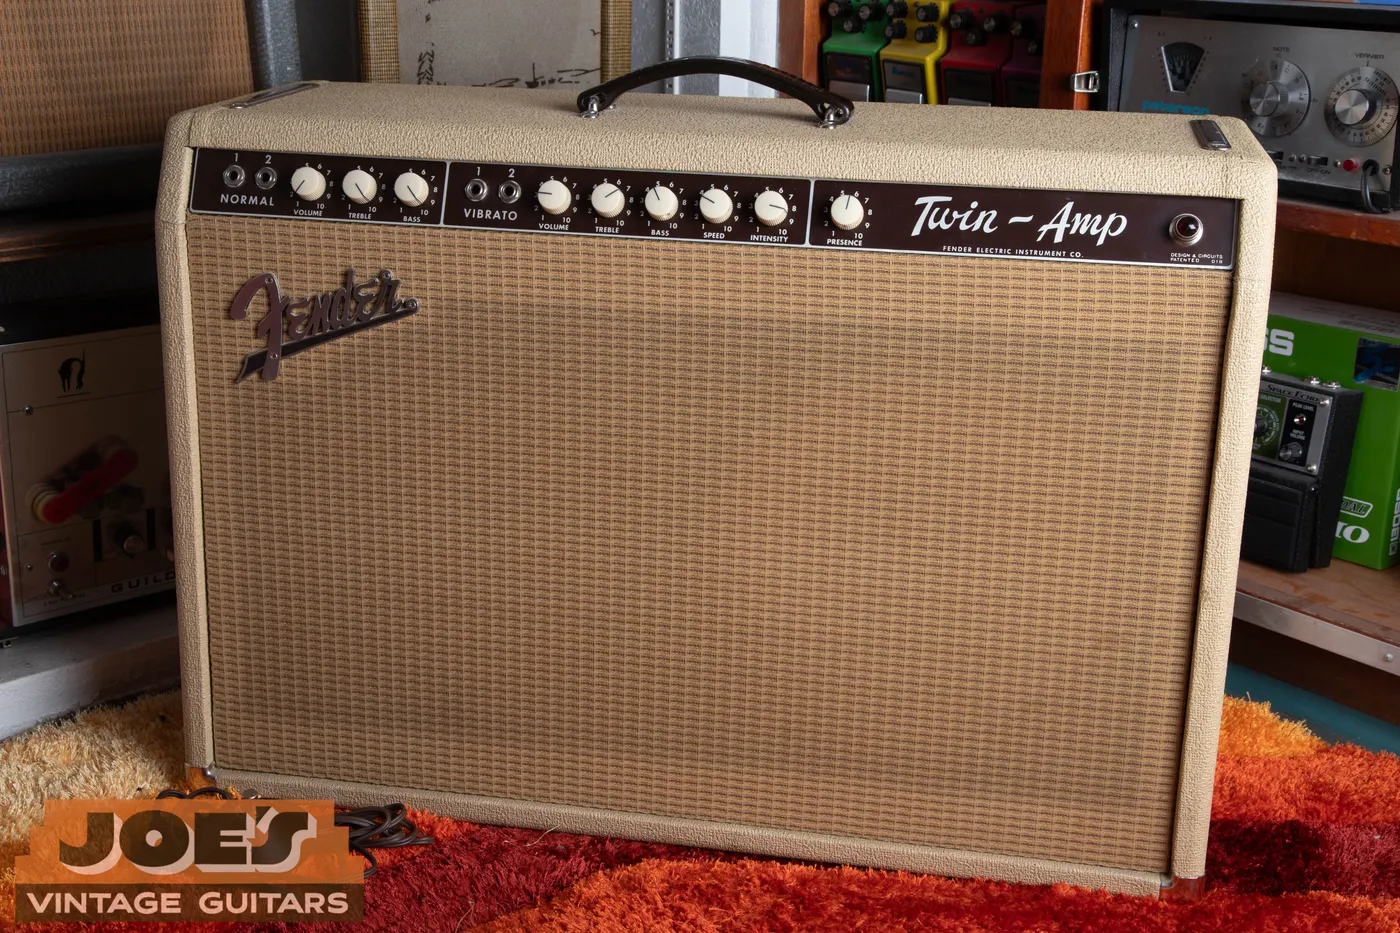
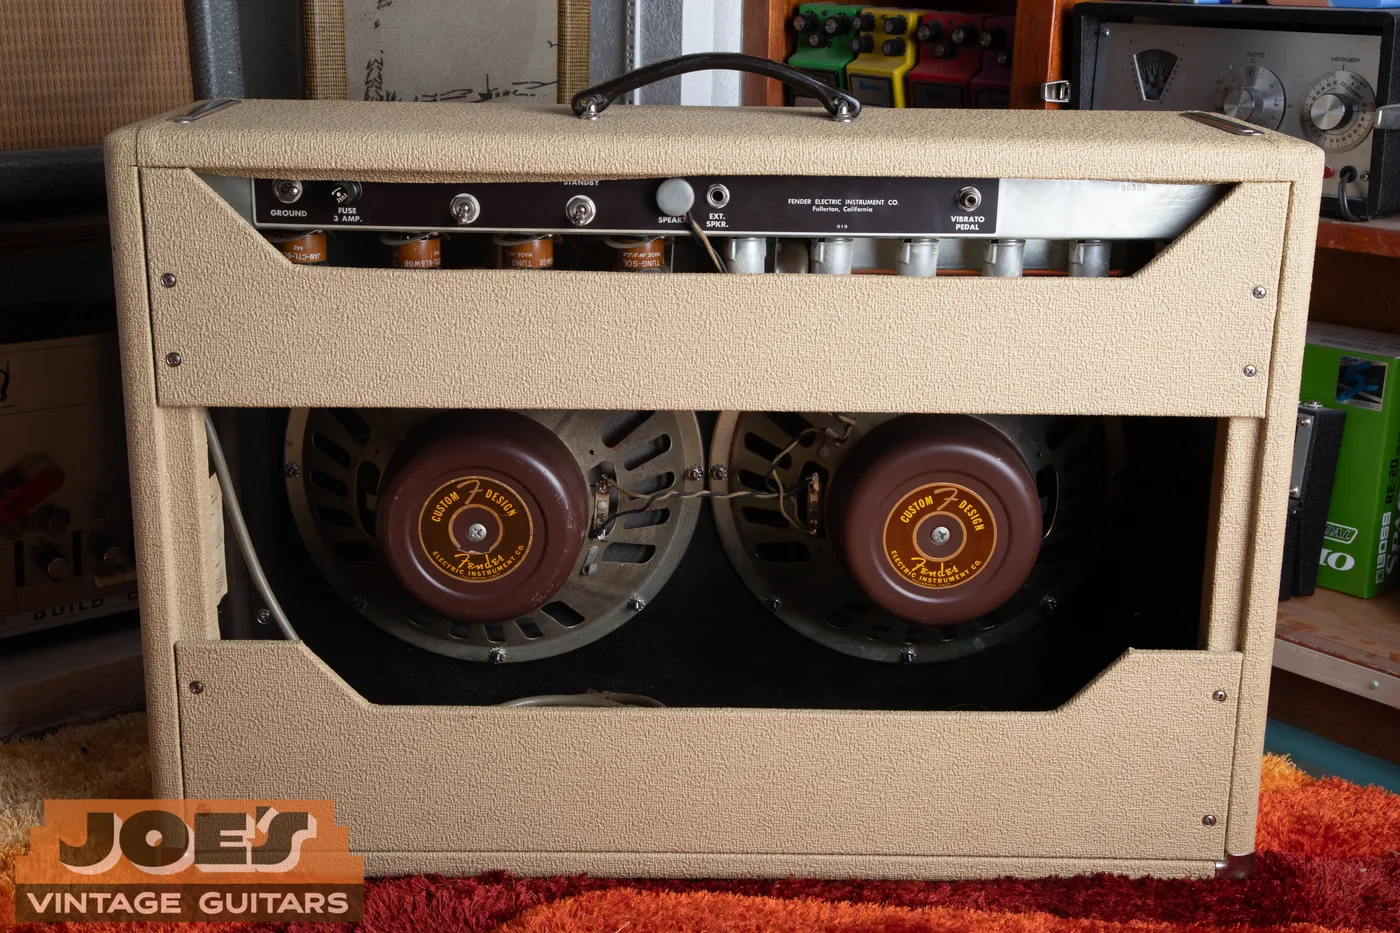
The white covering, brown panel, barrel knobs and two-speaker rear opening identify the visible family. The chart and choke photographs provide additional evidence from this same amplifier. No single front photograph certifies the condition of its hidden electrical parts.
Blackface Twin Reverb
1966 Fender Twin Reverb
The later panel carries reverb controls and bright switches. The rear photograph shows both speakers and the footswitch. Use these views to plan photographs of your own amp, keeping any replaced components identified in the description.
Preserve A Clear Repair Record
Separate Routine Service From Structural Changes
Filter-capacitor replacement, tube replacement and power-cord work should be documented as service. Transformer replacement, reconing, recovering and cabinet substitution create additional originality questions. Their effect on an estimate belongs in the Twin value guide. A working amp can contain significant replacements, and an original-looking amp can require substantial electrical attention.
Retain repair invoices and photographs taken before a change. If parts were removed, label them with their location and the reason for removal. A retained failed component is useful historical evidence, but it shouldn’t be put back into operation for appearance’s sake. Ask a qualified technician to assess the current circuit and electrical safety.
Send The Evidence
Have Joe Review Your Twin
Send the exterior, chart and component photographs with the repair history. Include uncertainties so the review can address them directly.
Factory Records And Documented Examples
Twin Technical References
- Fender 5C8 Factory Schematic
Original tube complement and early circuit layout.
- Fender 5E8-A Factory Drawing
Low-power narrow-panel tube layout.
- Fender 5F8-A Factory Drawing
High-power narrow-panel tube layout.
- Fender ’65 Twin Reverb Service Manual
Factory PCB assembly details.
- Fender ’68 Custom Twin Reverb
Custom and Vintage labels and Celestion speaker identification.
- Fender’s Twin History
Model introductions, control changes, master volume and high-power development.
- Blonde Twin Field Guide
6G8-family configuration, hardware and component references.
- Blackface Twin Reverb
AB763 specification and physical features.
- Silverface Twin Reverb
Later output and control variants.
- Fender ’57 Custom Twin-Amp
Modern handwired model, pine cabinet and Eminence speakers.
- Fender ’65 Twin Reverb Manual
Modern reissue identification, controls, tube complement and service safety.
- Fender Tone Master Twin Reverb
Digital architecture and modern rear-panel connections.
Questions AboutFender Amp Identification
Can A Silverface Twin Reverb Have An AB763 Circuit?
Does A Master Volume Prove The Amp Was Modified?
Does Handwired Mean An Original Tweed Twin?
Can I Date A Twin From Its Chassis Serial?
The Last Word
Identify The Amp Before Pricing It
Describe the Twin’s generation, document its date evidence and list its repairs. Then use the Twin value chart for the matching version. The Fender era guide gives the broader visual context, and the Princeton, Deluxe and Twin comparison explains their different playing roles.
Authenticity And Originality Are Assessed From The Information Provided. A Hands-On Inspection Can Change The Conclusion.