

Fender Bass VI Identification · 1961 To 1975 Originals
Fender Bass VI Authentication Guide
Use the six-string bass layout as the starting point, then compare the neck, dates, electronics and hardware as a complete instrument.
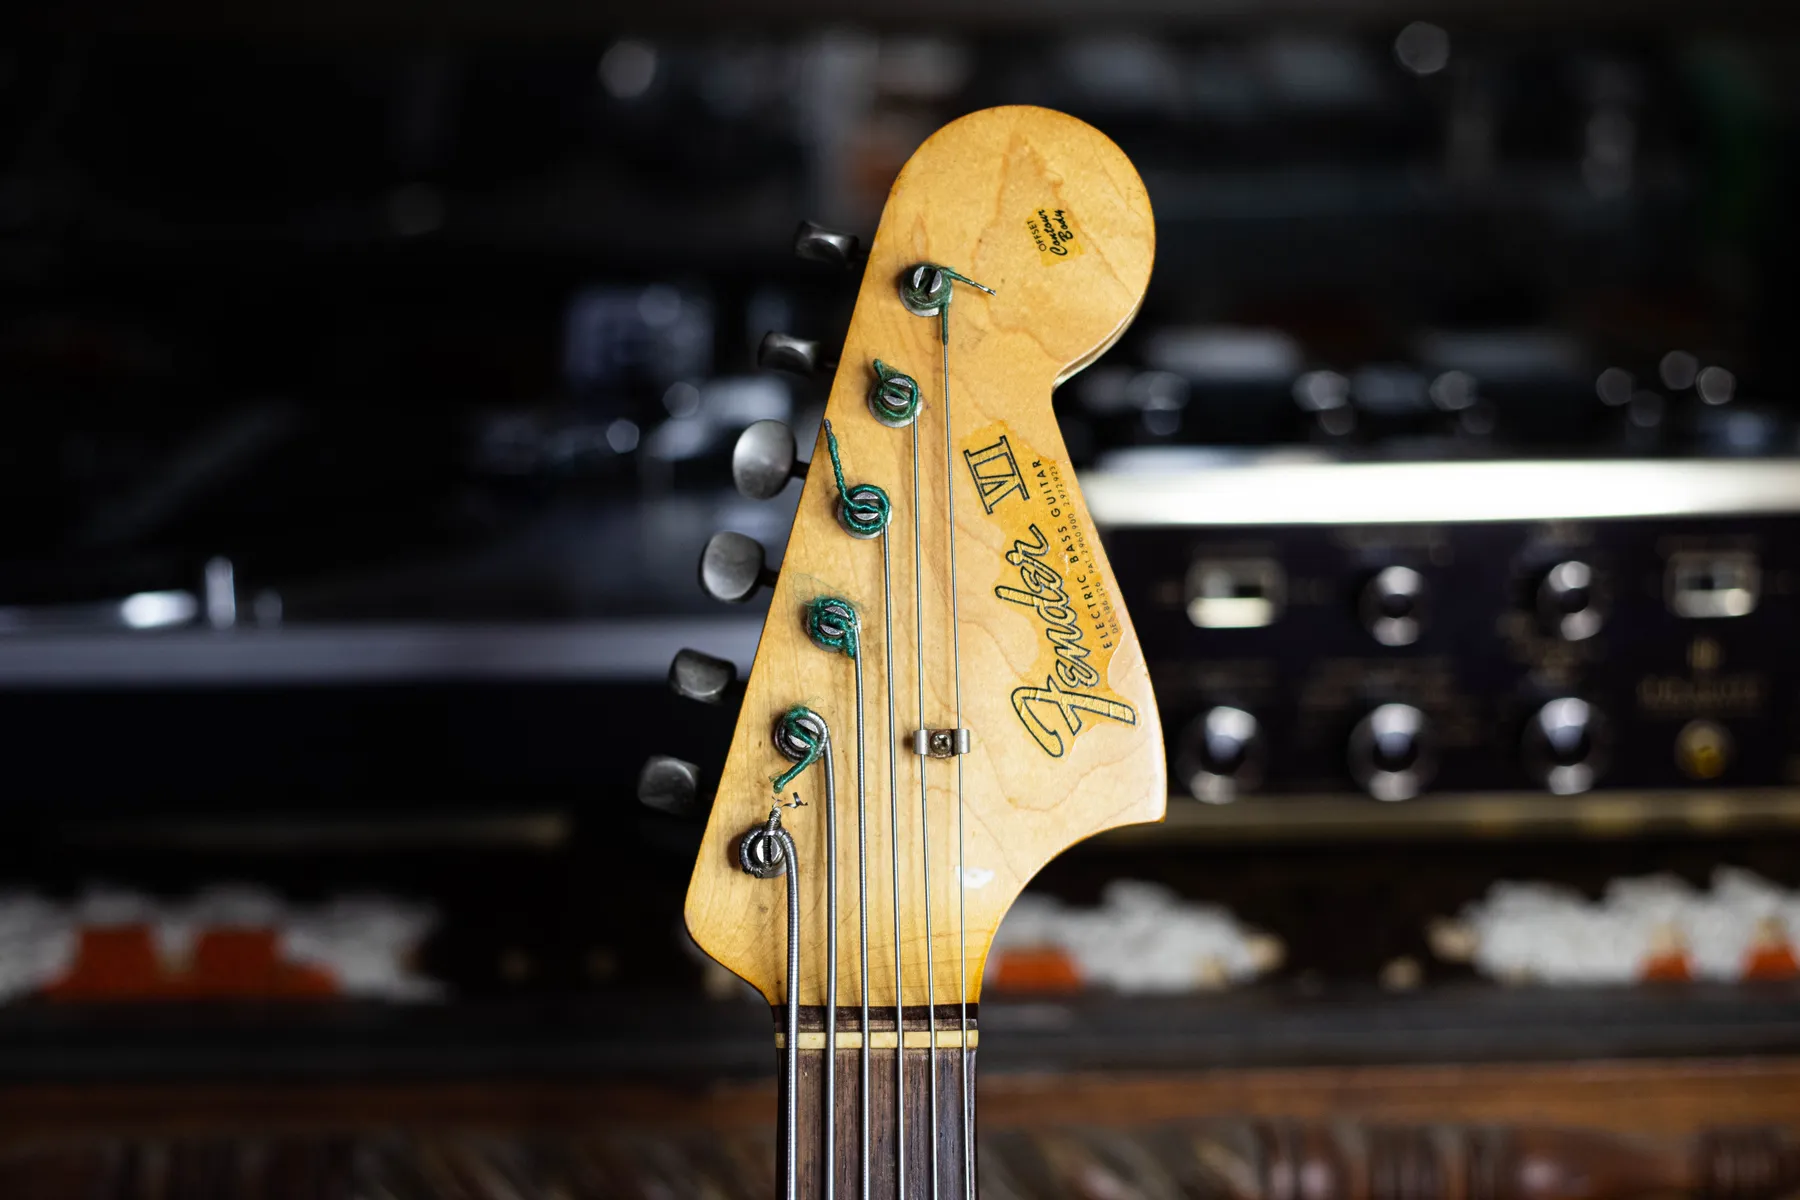
An original Fender Bass VI is a 30-inch-scale, six-string bass with three pickups and a floating vibrato. Establish its production period before using the Bass VI value guide. Its familiar guitar-style tuning sits an octave below a standard guitar. Authentication requires the model’s changing pickup, neck and switching details to agree with its serial and component dates. The photographs here show Joe’s 1963 example and a clearly labeled modern comparison.
Authenticity And Originality Are Assessed From The Information Provided. A Hands-On Inspection Can Change The Conclusion.
Scale, Tuning And Model Name
Identify The Six-String Bass Layout
| Feature | What To Record |
|---|---|
| Scale | 30 inches; measure nut to twelfth fret and double it |
| Strings And Tuning | Six bass strings; E A D G B E one octave below guitar |
| Pickups And Controls | Three pickups; record three-switch or four-switch arrangement |
| Bridge Equipment | Floating bridge, separate vibrato and period-appropriate mute equipment |
| Neck | Rosewood fingerboard; compare dots, binding and blocks with the period |
The Bass VI uses six strings arranged E, A, D, G, B and E, with the lowest four in the same register as a conventional four-string bass. Its 30-inch scale and relatively close string spacing explain why it can feel familiar to a guitarist while requiring bass strings and a suitable setup. String count alone can’t distinguish it from a baritone guitar or a conversion.
Measure scale length from the nut to the twelfth fret and double that distance. Measuring to a saddle can include the extra length used for intonation. A full instrument photograph should show the relationship between the neck, bridge and vibrato before a close-up is used to assess individual parts.
The headstock wording on vintage examples is Fender VI. The short marking belongs to the model; it doesn’t need to spell out Bass VI. A familiar decal can also be reproduced, so compare its lettering and placement with the rest of the headstock, finish and period features.
Fender’s original American production ran from 1961 to 1975. Later Fender and Squier instruments share recognizable styling. A model advertised with an earlier year in its name may be a reissue, and a seller’s description of a vintage appearance provides no manufacturing date by itself.
Four Switches And A Bridge Mute
Read The Details On Joe’s 1963 Bass VI
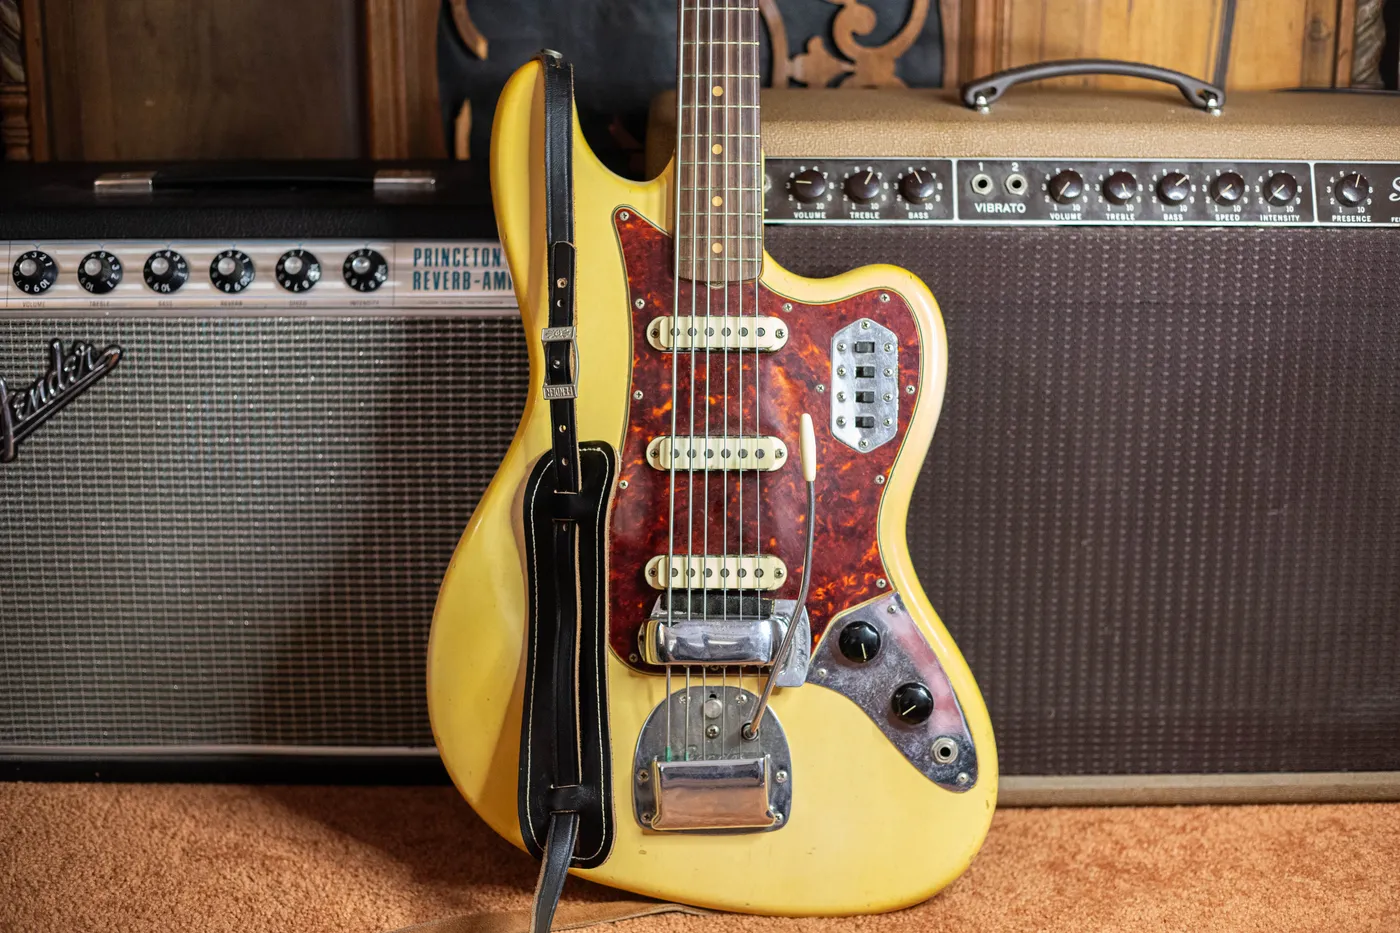
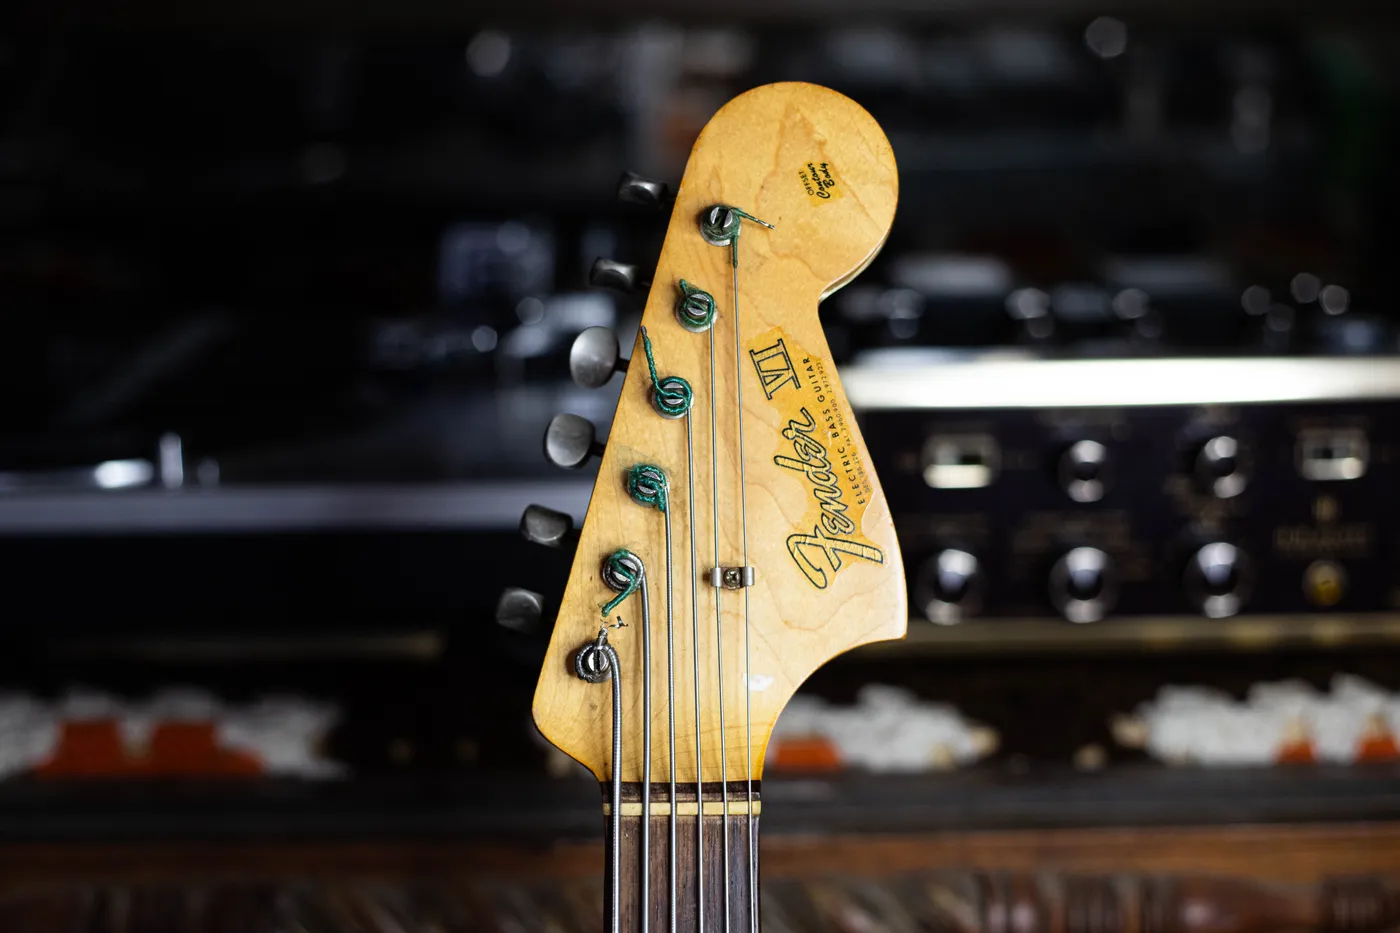
The body photograph shows three pickups beneath the strings, four slider switches on a chrome plate, a separate volume-and-tone control plate and the mute beside the bridge. The pickup surrounds in this image look smooth, rather than showing prominent Jaguar-style notches. The photograph records that combination; it cannot by itself establish whether the pickup and control arrangement is transitional or altered. Its 1963 archive identification should be evaluated alongside those details rather than turned into a rule that every part changed on January 1.
Look carefully at the switches before counting them. A dark switch against a reflective plate can disappear in a small thumbnail. The full photograph resolves all four. Close photographs taken straight toward the controls are more useful for another instrument than a dramatic angle that hides a switch behind a reflection.
The headstock image adds the logo, tuner layout and condition of the front surface. It doesn’t reveal the neck heel or prove that the neck and body have always been together. Record what each picture actually shows, and leave the hidden construction questions for existing service records or an appropriate hands-on inspection.
The aged light finish and tortoise-style pickguard should also be described separately. Establishing a specific factory color requires a finish review. Among factory custom colors, Olympic White is the expected tortoise-guard pairing; a different claimed custom color with that guard deserves closer inspection of both the finish and the guard’s history.
Use Transitions As A Cross-Check
Bass VI Features Across The Original Run
Early Pickup And Switch Arrangement
Early instruments use three pickup on/off switches and smooth chrome pickup surrounds. The later Jaguar-style surrounds have visible notches or claws. Record the plate, pickups and guard together. A replacement plate may change the visible switch count without changing the age of the body.
Four-Switch Layout And Mute
The familiar later arrangement adds a bass-cut switch, with Jaguar-style pickup details and bridge mute equipment. Transitional instruments should be assessed individually against their component dates and unaltered construction.
Binding And Block Inlays
Neck binding appears in the late-1965 period, followed by block inlays in 1966. A bound dot neck and a bound block neck represent different stages. Refinishing or a replacement fingerboard can obscure useful evidence.
Later Neck And Logo Features
Later examples carry the evolving Fender logo and appointments. Document the actual neck, tuners and finish before assigning a year. Original production ends in 1975; a later instrument needs comparison with the appropriate reissue series.
These changes are a sequence for investigation. An apparent mismatch can result from a transition, replacement component, repair or an incorrect date claim. Write down the mismatch precisely. “Four switches on an instrument described as early” is a useful question; an unsupported conclusion about the entire bass is premature.
The Fender neck-date guide explains the different pencil and stamped systems. Use the system appropriate to the period. A neck date represents a component’s production stage and can precede final assembly, so a small gap between neck and pot dates doesn’t automatically establish a parts instrument.
Build A Consistent Date Range
Serial Numbers And Component Dates
Start with a clear photograph of the serial number and its surrounding plate or surface. Transcribe every visible character without completing a faint digit from a serial chart. Fender used overlapping number ranges and parts stock, so serial information is most useful as one part of a wider date assessment.
Use the Fender serial-number guide to place the number in context. A removable neck plate can be exchanged. Its date range should agree reasonably with the neck construction, headstock logo, tuners, pickup arrangement and other evidence that belongs to this model.
If a neck-heel photograph already exists, preserve the entire heel in the image. Stamped codes contain more information than a year, and partial photographs can remove the context needed to read them. An indistinct mark should remain uncertain until a clearer image or inspection resolves it.
Potentiometer codes identify the maker and production date of the component. A CTS code often begins 137, while Stackpole uses 304. The remaining digits need to be read in the proper format and decade. An older pot can have remained in stock before assembly, and a replacement pot dates the replacement component.
Record a pencil date on the body if one is documented. Its handwriting, finish relationship and agreement with the other evidence matter. Don’t sand, scrape or clean a mark to improve its readability. For an initial appraisal, exterior photographs and any existing service images are enough to begin.
Check Function Before Assuming Failure
Pickups, Switches And Wiring
Three switches select the individual pickups in the familiar four-switch arrangement. The additional switch cuts low frequencies. It can make the sound thinner, which is its intended function. A silent setting can simply mean that every pickup is switched off; test the controls methodically before describing the bass as electrically dead.
Photograph the pickup covers, mounting details and exposed pole pieces. Original covers can remain after a rewind or internal replacement. If service photographs show the underside, include the base, leads and any markings. A single resistance reading doesn’t authenticate the winding or prove that a pickup has never been repaired.
Changes to wiring should be described with their practical effect. A replacement switch, new jack or altered bass-cut circuit can affect operation while leaving the front view almost unchanged. Record the service history and whether the original parts remain. Recreating old-looking solder doesn’t restore an original assembly history.
Inside an offset Fender, inspect any original shielding tubs as part of the cavity and electronics documentation. Changed shielding, new leads or disturbed joints can provide repair clues, but each observation needs context. Avoid pulling a tightly wired plate away from the body just to obtain a photograph.
A technician can document the controls during necessary service. Ask for photographs before work begins, particularly if an intermittent fault requires replacing a component. That record helps the next owner understand what was found and what was changed.
Distinguish Setup Work From Structural Changes
Bridge, Mute, Vibrato And Neck Condition
The floating bridge, mute and vibrato are separate assemblies. Photograph each, including the arm and any loose covers. A missing mute pad can affect function without indicating that the whole mute mechanism is absent. Identify the actual missing or damaged piece before describing the instrument as incomplete.
Players sometimes install another bridge to address string stability or intonation. Compare the replacement’s mounting arrangement with the body and include the removed bridge if it survives. Added holes, enlarged openings and permanently altered mounting points need to be recorded separately from a part that lifts out of the existing supports.
Check whether the neck appears twisted, whether frets are heavily worn and whether the strings sit at a usable height. The thick low strings need appropriate clearance and intonation adjustment. Poor setup can have several causes, and photographs alone can’t reliably diagnose a truss-rod fault.
Look for repairs around the headstock, heel and neck joint. Finish checking can cross a joint without being a structural break, while a carefully repaired break may be subtle. Combine wider views with close-ups and any repair invoice. Don’t flex the neck or force an adjustment to demonstrate a suspected problem.
When describing playability, include the string set and tuning currently used if known. A bass set up for a different tuning may behave poorly after an owner changes strings without adjusting it. Record buzzing, strings slipping from their saddles or notes that will not intonate, and identify which strings are affected. Those observations help a repairer distinguish a setup issue from worn hardware or a structural problem. They also prevent an otherwise useful instrument from being described as defective on the basis of one unfamiliar playing session.
Country Markings And Series Identity
Recognize Reissues And Modern Bass VIs
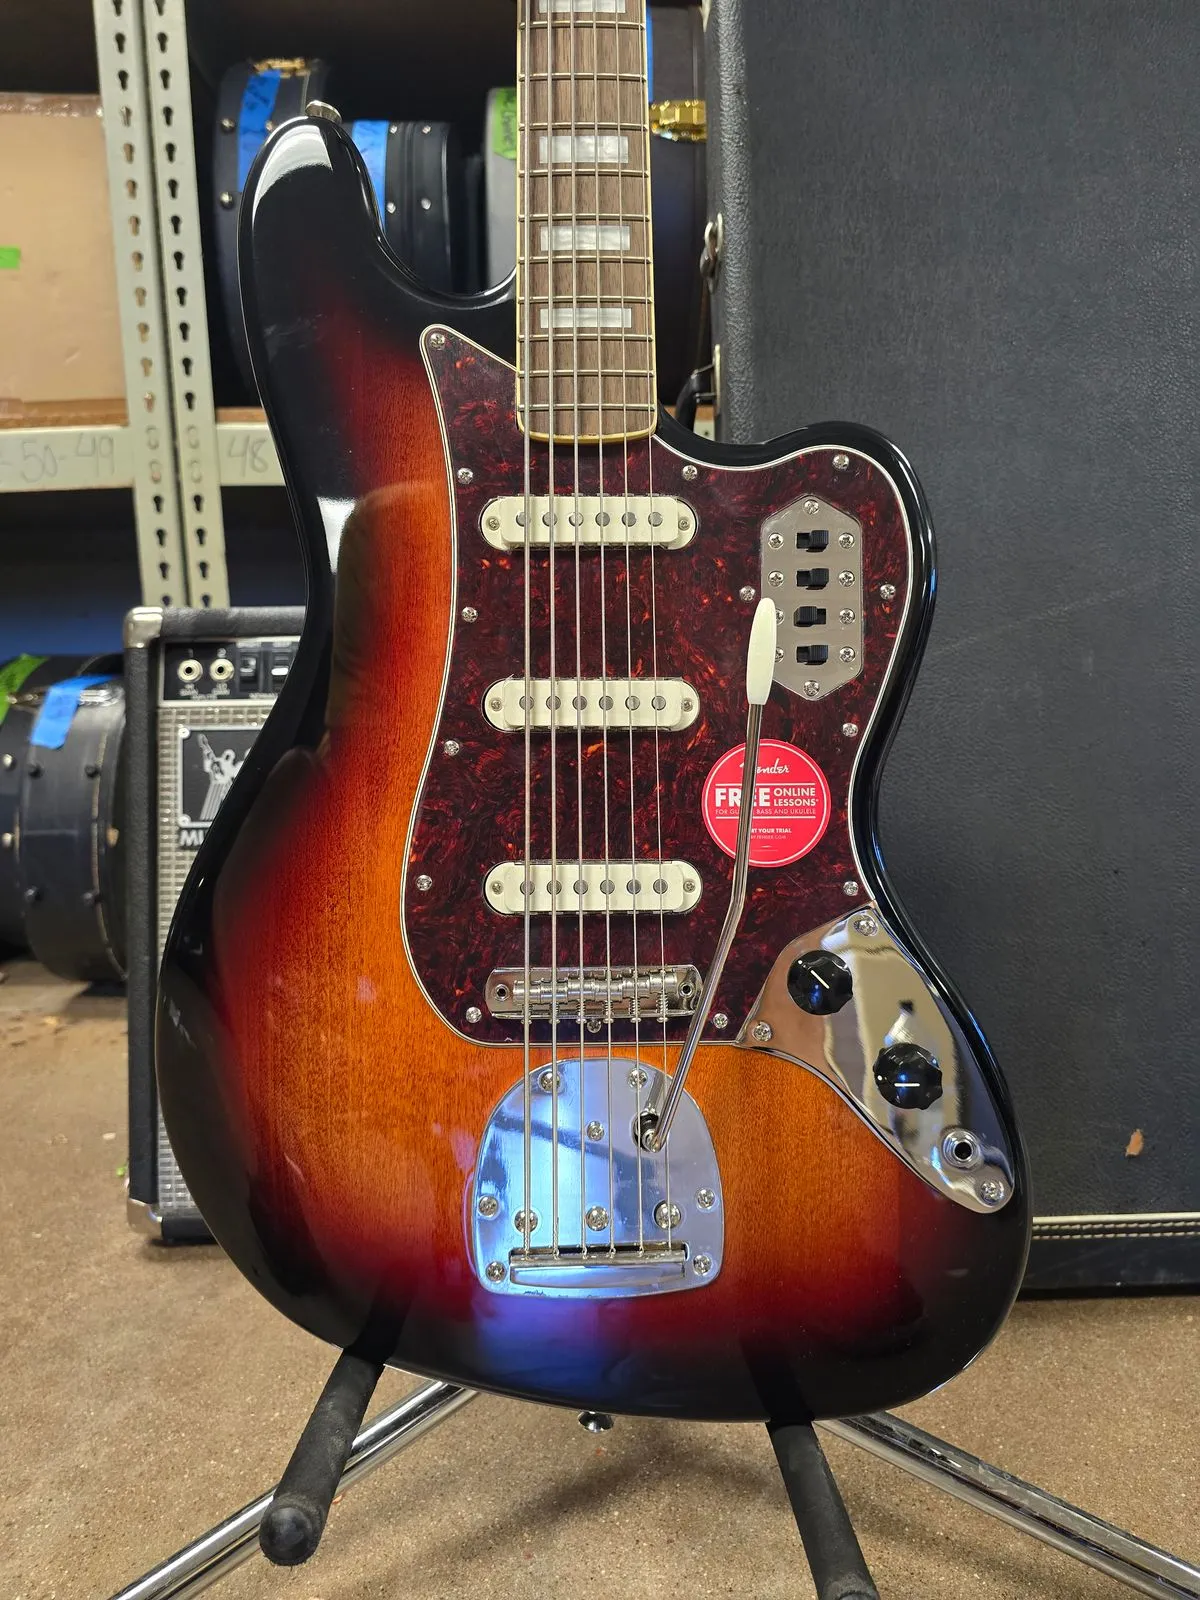
This Squier Classic Vibe example is a modern comparison. Its offset body, block inlays and four switches reproduce familiar design features. Those features establish a style, while its branding, manufacturing markings and serial format identify a different production series.
Japanese Fender reissues and other later Fender versions also require their own serial and country-of-origin checks. Photograph both sides of the headstock and any neck markings. Don’t interpret a reissue’s vintage-style appointments with an original-1960s serial table.
An aftermarket decal can obscure the most obvious distinction. If the branding, serial, routing and hardware don’t agree, document the conflicting evidence before buying parts or assigning a vintage year. An assembled instrument can contain authentic Fender components from more than one period.
The original Bass VI value guide applies after the instrument has been identified. Keep the manufacturing date, design being reissued and date of any modifications separate in the description so the price comparison starts with the right instrument.
A Useful First Inspection Set
Photographs For A Bass VI Identification
Complete Front And Back
Include the whole body, neck and headstock. Use even lighting and preserve the full-resolution files. Add a side view when a repair or altered contour is suspected.
Markings And Working Parts
Show the serial, both headstock faces, pickups, switches, bridge, mute and vibrato. List settings that are silent or intermittent and note any service already performed.
Existing Internal Evidence
Send dated service pictures of the heel, pots or wiring if available. Keep disassembly for a qualified repairer when necessary, and include all loose original equipment and the case.
Send The Evidence
Identify Your Fender Bass VI
Joe can begin with the exterior photographs, visible serial and repair history. Include the features that seem inconsistent so the review can address them directly.
Factory History And Period Documentation
Bass VI Reference Material
- Fender Bass VI History
Production sequence and changes to neck appointments.
- Fender Explains The Bass VI
Scale, tuning and model terminology.
- 1963 To 1964 Fender Catalog
Period factory catalog scan showing the Bass VI alongside other Fender instruments.
Questions AboutFender Identification
Is The Fourth Bass VI Switch A Pickup Selector?
Does A Fender VI Decal Mean The Name Is Wrong?
Can A Serial Number Authenticate A Bass VI?
Should I Remove The Neck For A First Appraisal?
The Last Word
Keep The Evidence Together
A convincing Bass VI identification comes from agreement between construction, dates and documented condition. Once that is established, use the Bass VI price guide and an individual appraisal to discuss value.
Authenticity And Originality Are Assessed From The Information Provided. A Hands-On Inspection Can Change The Conclusion.